
Acquiring Use Cases
Overview
Eclipse has extensive payment processing capabilities and supports a multitude of options to acquire funds / payments into a tenant's ecosystem. These acquired payments can either be done as an individual sales organisation (ISO), where the tenant has a merchant account with a bank. Alternatively, Ukheshe can act as a super merchant for a tenant acquiring on behalf of that tenant.
Typically the acquiring options available to a tenant are the Eclipse payment processing capabilities described under Payment use cases - any payment option can be used by a tenant to collect money into a designated wallets. This includes but is not limited to:
Card Acquiring - e-Commerce card not present (CNP) payments including 3DS/AMT
- Payment type and use case: GLOBAL_WALLET
Card Acquiring - Google Pay™
- Payment type and use case: GOOGLE_PAY
Card Acquiring - card present MPOS/Tap On Phone
- Payment type and use case: GLOBAL_TOG
Cash In at Retailer Acquiring - PicknPay
- Payment type and use case: ZA_PNP_CASH
Instant EFT Acquiring - Ozow
- Payment type and use case: ZA_OZOW
QR Acquiring - Masterpass Scan to Pay QR
- For full details refer to QR Acquiring - Masterpass Scan to Pay.
QR Acquiring - Scan to Pay Deep Linking
- On mobile devices this allows an application to invoke Scan To Pay supported applications (e.g. FNB, Nedbank, Capitec, Scan To Pay app) to complete a payment. For full details refer to Scan to Pay deep linking.
QR Acquiring - Mastercard QR (MCQR)
- For full details refer to QR Acquiring - MCQR.
QQ Acquiring - VisaQR
- Payment type and use case: GLOBAL_EMVCO
Payment links - the ability to easily distribute payment requests using any of the above payment options through flexible single use or reusable payment links.
- Payment type and use case: GLOBAL_PAYMENT_LINK
- Payment type and use case: GLOBAL_REUSABLE_PAYMENT_LINK
coming soon Samsung and Apple Pay
MasterCard/Visa Integration with Eclipse Visa and Mastercard Click to Pay
Hosted Checkout
Tenants can choose to integrate directly to the payment APIs above as an enterprise integration - this allows full control of the UIX. An alternative option for easier and quicker integration is to use Eclipse Hosted Checkout.
Eclipse hosted checkout allows a tenant to easily generate a URL with a single API call using payment links (either a single use payment link or a more flexible reusable payment link) and the returned URL can be rendered for the customer to complete their payment. This includes the full card journey in terms of capturing card details, completing 3DS, etc.
Eclipse Hosted Checkout supports all Eclipse payment types and these can be enabled at a tenant level by setting the paymentType parameter in the global property public.tenant.{tenantId} - allowed values are mastercard, ozow, pnpcash and eft.
A tenant should be configured for all the payment types allowed on the hosted tenant page. Refer to Payments Use Cases for the prerequisites for each payment type.
Eclipse hosted checkout supports customer branding in terms of logo's, colours, etc. For full details refer to Customisation of the Captive Portal UI.
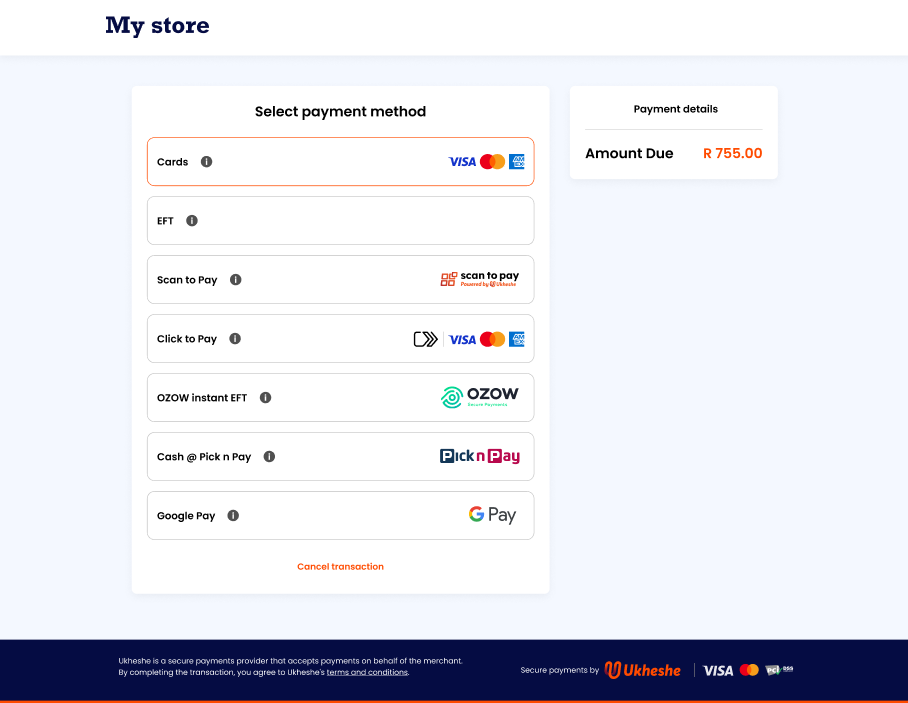
Generic Eclipse Hosted Checkout Desktop
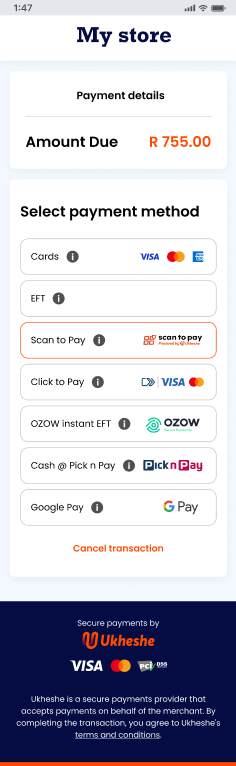
Generic Eclipse Hosted Checkout Mobile
Enterprise Integration
This section describes acquiring options for tenants that want to integrate directly to the payment APIs as an enterprise integration.
Note
Additional enterprise integration options for acquiring mentioned in the acquiring overview section e.g. Cash in at retailer acquiring, Instant EFT acquiring are all covered under Payment use cases.
Card Acquiring - E-commerce
Eclipse can be used to enable e-commerce for tenants who want to securely store tokenised card on file and process card not present (CNP) card payments including 3DS.
A typical use case would be an e-commerce retailer who wants to enable card payments through their existing customer channels. Eclipse APIs can be used to:
- To store and retrieve tokenised customer card on file details - refer to Card On File Management for full details.
- Initiate card payments using the card on file, through card rails with settlement to the designated merchant - refer to GLOBAL_WALLET payments for full details.
QR Acquiring - Masterpass Scan to Pay QR
Masterpass Scan to Pay QR Acquiring enables tenants in South Africa to securely generate Masterpass QR codes that are linked to an Eclipse wallet. Any Masterpass Scan to Pay supporting application can scan and pay these QR codes and the funds will be settled into the relevant Eclipse wallet.
Prerequisites
- Eclipse digital wallet created
- For merchant acquiring the created wallet should either be a tenant wallet (if the tenant is the acquiring merchant) or an organisation wallet (where the organisation is the acquiring merchant)
- For merchant acquiring the merchant category code needs to be specified on the tenant if the tenant is the acquiring merchant or on the organisation if the organisation is the acquiring merchant. (Refer to MCC List for MCC codes)
- The tenant must be signed up as a Masterpass merchant
- The masterpass merchant setup must settle to the Nedbank acquiring pool account
- API access must be enabled in the masterpass portal
- Tenant config masterpass.config.aesKey must be set to the notification key.
- Tenant config masterpass.config.apiUser and masterpass.config.apiPassword must be set to the masterpass API
- credentials for the merchant
- The masterpass notification URL must be set to https://ukheshe.live/eclipse-conductor/rest/v1/masterpass/incoming-payments?configId=XXX where XXX is the tenantId
Step 1 - Generate a QR Code
Tenants can generate a QR Code and link it to a specific wallet. An already created QR Code can be provided and linked to the wallet or a QR code can be generated as part of this API call. QR codes can also be generated for a specific amount and explicit expiry date if values are passed for amount and expires parameters. If these parameters are omitted the QR code will never expire and the amount will need to be provided then the payer would enter the amount upon payment.
QR codes are generated using the Create QR Endpoint:
POST /eclipse-conductor/rest/v1/tenants/{tenantId}/wallets/{walletId}/qr-codes
{
  "merchantName": "Johns Bakery",
  "type": "ZA_MASTERPASS",
  "description": "QR Code for Johns Bakery",
  "reference": "Ext-1234567"
}
Example response body:
{
  "walletId": 36714,
  "type": "ZA_MASTERPASS",
  "code": "2997973598",
  "currency": "ZAR",
  "reference": "Ext-1234567",
  "merchantName": "Johns Bakery",
  "description": "QR Code for Johns Bakery",
  "additionalFields": []
}
This QR Code can now be displayed or distributed through whatever means the channel intended and any Masterpass Scan to Pay supporting application can scan and pay the QR code and the funds will be settled into the wallet mapped to the QR code.
There are also endpoints to bulk create QR codes, update QR codes and bulk update QR codes.
QR Acquiring - MCQR
Mastercard QR (MCQR) enables tenants to generate MCQR codes that are linked to an Eclipse wallet. MCQR uses the concept of a receive only PAN as the destination of the payments. This means that a card needs to be issued and associated to the destination Eclipse wallet that must be created with mode receiveonlycard. MCQR is available in any region where MCQR is enabled.
Prerequisites
-
Card issuing program created for receive only cards
-
Eclipse wallet created with mode receiveonlycard
-
Tenant config mcqr.config.partnerId must be set to the notification key.
-
Any app generating MCQR codes must be certified by Mastercard
Step 1 - Generate a QR Code
Tenants can generate a QR Code and link it to a specific wallet. An already created QR Code can be provided and linked to the wallet or a QR code can be generated as part of this API call. QR codes can also be generated for a specific amount and explicit expiry date if values are passed for amount and expires parameters. If these parameters are omitted the QR code will never expire and the amount will need to be provided then the payer would enter the amount upon payment.
QR codes are generated using the Create QR Endpoint:
This QR Code can now be displayed or distributed through whatever means the channel intended and any MCQR supporting application can scan and pay the QR code and the funds will be settled into the wallet that is associated to the receive only PAN.
Card Acquiring - card present MPOS/Tap On Phone
Card Acquiring - card present MPOS/Tap on Phone - Kernel in the Cloud (KiC) Visa Acceptance Cloud (VAC)
Visa Cloud Acceptance (VAC), also know as Kernel in the Cloud (KiC), enables contactless payments on any Android device or phone (Android OS 12 and newer) provided they are NFC-enabled without any additional hardware. VAC is EMV L2 certified.
This is available as an SDK for App integration described below. Alternatively Ukheshe provides the option of using a companion app to manage the Tap On Phone payment process. This requires simpler integration than integrating to the VAC SDK and also means that future verifications and lab testing will not be needed for Tap On Phone on the tenant app as this will be covered by the companion app. For more details please refer to the Tap on Phone Integration Guide.
Benefits of VAC
- Simplified L2 certification requirements resulting in faster time to market
- Low integration cost
- Transforms any connected device into a POS, enabling new payment flows and experiences
- Enabler for integrated value-added services
Device Requirements
- Android OS version should be 12 or higher
- Google Play service-supported device
- Should have the NFC capabilities
- Should have Hardware keystore (ELIGIBILITY_HARDWARE_KEYSTORE_PRESENT)
End-to-end VAC Process
The steps below demonstrate the actions from pre-transaction initiation to the updates needed upon success or failure response. The VAC SDK documentation should be requested for the Visa Developer Portal.
VAC Prerequisites
- Create a JWT
- Create an Organisation
- Create a new Wallet for the Organisation
- If you are using the VAC SDK directly in a new application and not using the Ukheshe companion app - your application must be registered with Visa on sandbox and production including app package name, acquiring bank and Visa project application ID. Contact [email protected] to have an application registered to Visa for sandbox and production for your applications.
Required tenant configuration:
- For full set of required tenant configs refer to VAC/KiC Tenant Setup
- fees.amount.config.Pay.GLOBAL_TOG_VAC.CARD.SERVER=0.1P | Fees amount
- fees.wallet.config.Pay.GLOBAL_TOG_VAC.CARD.SERVER={WalletID} | Wallet ID to credit for fees
- source.wallet.config.GLOBAL_TOG_VAC.CARD.SERVER={WalletID} | Wallet ID to debit when a customer receives funds
Enabling mPOS
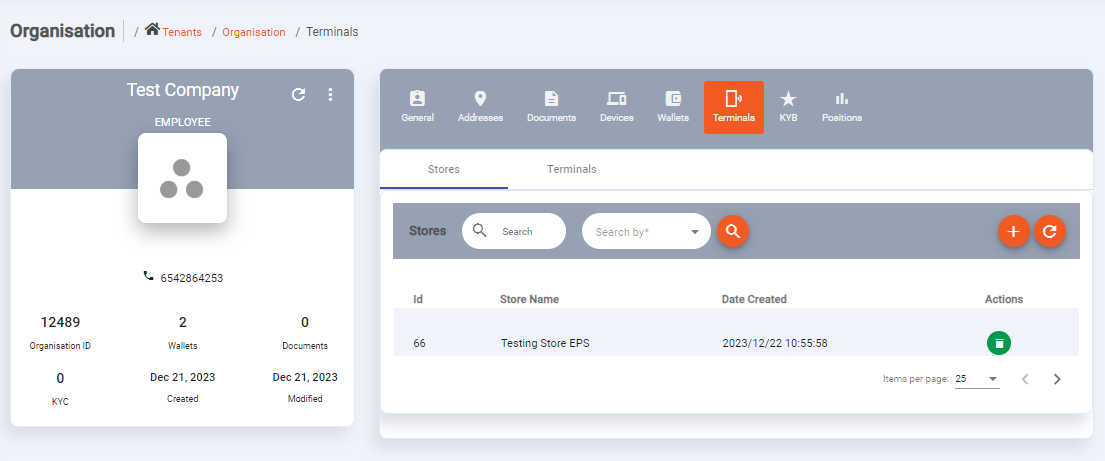
Step 1: Create a Terminal Type
For each tenant a kernel profile must be registered with Visa and made available as a terminal type to the tenant in order for terminals to be created and assigned to organisations. This is a backoffice task. The following screenshot show a terminal mapping created and mapped to tenant id: 7719:
 ** Attribute allowMultipleInstance will allow for multiple Terminal Instances to be created using this Terminal Type
Note
Typically a single, default terminal type is created and used in a tenant for all instances. However different terminal types can be created with custom settings for accepted cards, floor limits, refunds, etc. and then applied to specific users and wallets.
Only 1 device can be registered at a time per Terminal
Step 2: Create a New Store against the Organisation
A store in VAC terms represents a shop or store. Typically when implementing in a Eclipse 1 store is created per organisation.
Below is an example request:
POST /eclipse-conductor/rest/v1/tenants/{tenantId}/organisations/{organisationId}/stores

{
  "name": "R&P VAC Store",
  "city": "Cape Town",
  "country": "South Africa",
  "line1": "54 Forest Street",
  "state": "Western Cape"
}
Below is an example response:
{
    "storeId": 9,
    "name": "R&G VAC Store",
    "created": "2023-06-20T10:49:21.000Z",
    "lastModified": "2023-06-20T10:49:21.000Z",
    "city": "Cape Town",
    "state": "Western Cape",
    "line1": "54 Forest Street",
    "country": "South Africa",
    "version": 0,
    "mappings": [
        {
            "identifierType": "VAC",
            "identifier": "877fda01-7bf3-9ad9-188b-12f24535bb01"
        }
    ]
}
Step 3: Add a New Terminal against the Organisation
A terminal in VAC terms represents an actual device to accept payments. In most implementations a single terminal type is created for the tenant, and a single terminal is created per organisation. However if multiple terminal types exist then multiple terminals can be created on an organisation. These terminals can use different terminal types and can be configured to be locked to a particular user or wallet e.g. you only want a particular user to be able to use the terminal that can process refunds.
Below is an example request to create a terminal:
POST /eclipse-conductor/rest/v1/tenants/{tenantId}/organisations/{organisationId}/terminals

{
  "name": "R&P VAC Terminal",
  "storeId": "{{storeId}}",
  "terminalTypeId": "{{terminalTypeId}}",
  "status": "ACTIVE"
}
Below is an example response:
{
    "terminalId": 10,
    "terminalTypeId": 9,
    "storeId": 9,
    "name": "R&P VAC Terminal",
    "status": "ACTIVE",
    "created": "2023-06-20T10:50:41.000Z",
    "lastModified": "2023-06-20T10:50:41.000Z",
    "configuration": [],
    "version": 0,
    "mappings": []
}
Once the above is complete, VAC integrations will be initiated as per the Visa requirements.
Note
Stores and terminals can be viewed, added and deleted in the admin portal in the Terminals tab under an Organisation:
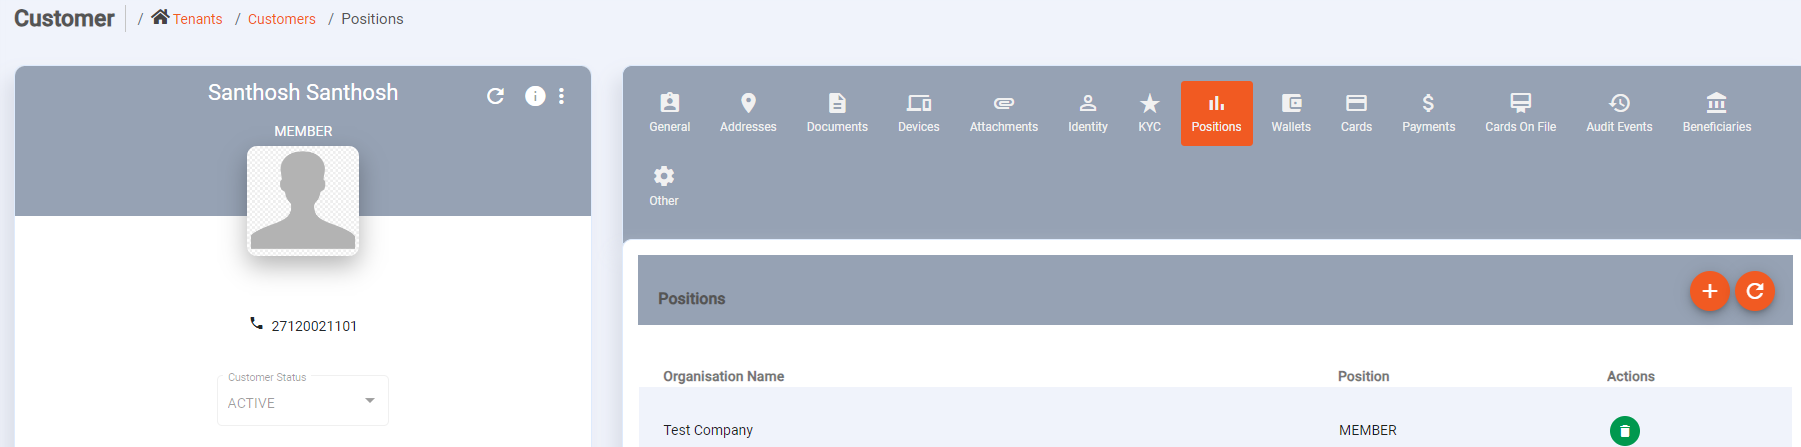
Step 4: Link calling user to organisation
The user completing the API calls in the subsequent steps needs to be a member of the organisation against which the store and terminals have been added.
Typically the API calls are done as the customer, and the customer is added as a member of the organisation. However tenants using a tenant system user to access Eclipse on behalf of customers would need to add a User with LEVEL_10 permissions and link that user as a member of all the organisations for which Tap On Phone payments will be initiated. This LEVEL_10 user should be used for all Tap On Phone payments.
Below is an example request to add a user to an organisation using APIs:
POST /eclipse-conductor/rest/v1/tenants/{tenantId}/customers/{customerId}/positions

{
  "position": "MEMBER",
  "organisationId": 12583
}
Below is an example response:
{
  "organisationId": 12583,
  "position": "MEMBER"
}
User can be added to an Organisation using the Admin Portal by navigating to the customer then positions:
Step 5: Initiate Tap on Phone Payment
The below are prerequisites:
- Tracing must be implemented. If this is not done, debugging functionality will be disabled
- Check the version of the application to force upgrades
- CheckVacEligibility. This will check if this device can run VAC
Below is an example request for initiating a payment:
POST /eclipse-conductor/rest/v1/tenants/{tenantId}/payments

{
  "destinationWalletId": "{{walletId}}",
  "type": "GLOBAL_TOG",
  "amount": 510,
  "currency": "ZAR",
  "externalUniqueId": "{{$guid}}"
}
Below is an example response for initiating a payment:
"paymentId": 54202,
    "externalUniqueId": "42ef7499-f42a-47a8-a8f1-6393d1953bd3",
    "status": "PENDING",
    "amount": 510.000000000,
    "merchantName": "R&G VAC Test Org",
    "currency": "ZAR",
    "destinationWalletId": 247424",
    "acceptedCardSchemes": [],
    "acceptedPaymentMechanisms": [],
    "completionUrl": "eclipse://payment.service/tap?paymentId=54202&eclipseJwt="xxxx"",
    "paymentType": "CARD",
    "created": "2023-06-20T11:15:03.000Z",
    "paymentInstrumentInfo": {},
    "fee": 0,
    "walletId": 196955,
    "customerId": 1126
Step 6: Enroll the Device
If a device is NOT enrolled, the following must be done:
GET /eclipse-conductor/rest/v1/global/config/public.jwt.protected.visa.vac.sdk.setup
Initiate the SDK with the data from the above request. This will return device certificates which must be used to create a terminal as per the below request:
POST: https://eclipse-java-sandbox.ukheshe.rocks/eclipse-conductor/rest/v1/tenants/{{tenantId}}/terminals/enrollments

{
    "deviceCerts": [
        "xxx",
        "xxx",
        "xxx",
        "xxx"
      ],
  "deviceInfo": {
        "osType": "Android",
        "model": "SM-G973F",
        "manufacturer": "samsung"
    }
}
Enrolled device example response. The response is data passed to the SDK to instruct it to enroll the new device.
{
    "deviceId": "a8fd57fd-52c1-f2c8-4e9e-1f12c0477101",
    "deviceAuthPubKid": "4e1708ac-c8e3-45b8-a9a9-f49f64ba0d50",
    "xviaHint": "xxx"
}
Note
- Enrolling a device must only be done per app install. Save the enrolled device details in a local storage to avoid re-enrolling.
- The call to enroll a device must be done from a user that is linked to the organisation against which the terminals have been added
Step 7: Invoke Visa SDK to initiate transaction
- Start up the SDK (refer to the Visa documentation) - this checks whether the SDK is satisfied with your phone
- Make a payment by calling startTransaction (refer to the Visa documentation)
- Update Eclipse on SUCCESS or FAILURE of payment
Step 8: Update Eclipse on SUCCESSFUL or UNSUCCESSFUL payment
Below is an example request:
PUT /eclipse-conductor/rest/v1/tog/payments/{paymentId}
{
  "cardName": "xxxx",
  "cardLast4": "xxxx",
  "authCode": "xxxx",
  "reference": "xxxx",
  "status": "SUCCESSFUL",
  "transactionDate": "2018-05-11T13:35:11Z"
}
Below is an example response:
{
    "paymentId": 54203,
    "amount": 510.000000000,
    "fee": 0E-9,
    "currency": "ZAR",
    "unattended": false,
    "uniqueId": "096f1ac7-7f55-4151-8ef1-62a9128c279f",
    "tenantId": 8,
    "status": "FINAL",
    "userId": 1126,
    "walletId": 196955,
    "paymentType": "CARD",
    "paymentSubType": "SERVER",
    "gatewayStatus": "SUCCESSFUL",
    "gateway": "GLOBAL_TOG_VAC",
    "preProcessingCallbackIds": [],
    "postProcessingCallbackIds": [],
    "postSuccessCallbackIds": [],
    "postReversalCallbackIds": [],
    "completionUrl": "eclipse://payment.service/tap?paymentId=54203&eclipseJwt=eyJraWQiOiIxIiwiYWxnIjoiUFMyNTYifQ.eyJzdWIiOiJoYWxvdHN0Iiwic3JjIjoiQXV0aC1QIiwiY2giOiIrc2tLTk5qV0hpIiwicm9sZXMiOiIiLCJzZXNzIjoiZTIyODdlZTAtODIyZC00MTkzLTgxMmMtYTE5Mjc2NDg0NDJhIiwiaXAiOiI1NC44Ni41MC4xMzkiLCJpc3MiOiJodHRwOi8vZWNsaXBzZS1qYXZhLXNhbmRib3gudWtoZXNoZS5yb2NrcyIsImxvY2FsZSI6ImVuLVVTIiwidWlkIjoxMTI2LCJwb3MiOlt7Im8iOjgwLCJkIjowLCJwIjoiRU1QTE9ZRUUifV0sImV4cCI6MTY4NzI2MzQ2OCwiaWF0IjoxNjg3MjYyNTY4LCJ0ZW5hbnQiOjh9.KzLKh2dzevM2siNtfY5oYWAUrU-g32-d08NrEYdi4wkNXVaOtMblrh60lGOoz_br195v_WwClGhGVNayTrls-IzJxdWAIWnmsi3mOI9yM4d6dQIoCWAgiQ-Yho2Sq59L6KT97Q1-eqd01HYxqPsyEyyPtD_iPadht5BHPO1hHpFQiTyqP2r5_fATjfILWLouQ-X09nLomQcq2fe0hydqKunINu9UC3mlbZHB0deERJbEYqJKSkX6l5q4a9qG-GtHz5S_c55yC-mDYztJF3IBVsRDZMe371jNu4PjKw29HNpMNPVE3uOO4WPJRAd0xuwo-eiTlkMLCgPVyVL3Uu0PUw",
    "created": "2023-06-20T12:02:55.000Z",
    "lastPolled": "2018-05-11T13:35:11.000Z",
    "authCode": "1234",
    "createCardOnFile": false,
    "useCardOnFileIfAvailable": false,
    "additionalFields": [
        {
            "id": "merchantWalletId",
            "value": "196955"
        }
    ],
    "paymentReference": "xxxx",
    "cardLast4": "xxxx",
    "cardName": "xxxx",
    "merchantName": "R&G VAC Test Org",
    "acceptedCardSchemes": [],
    "acceptedPaymentMechanisms": [],
    "customFraudChecks": false
}
Flow of funds
To create a reservation in the credited wallet, until the funds are cleared in the tenant pool account, it is essential to configure the following property in the Tenant Configuration. This will be set by Ukheshe administrators
| Config Name | Description |
|---|---|
| reserveIncomingPayments | Whether or not ALL incoming payments to a wallet should be reserved until the inter-bank settlement has taken place and the amount has landed in the pool account. Defaults to false |
| reserveIncomingPayments.ZA_OZOW.EFT | If reserveIncomingPayments is false and this property is set to true, then all incoming OZOW are reserved until the inter-bank settlement has taken place and the amount has landed in the pool account. Defaults to false |
| reserveIncomingPayments.ZA_MASTERPASS_IN.CARD.SERVER | If reserveIncomingPayments is false and this property is set to true, then all incoming Masterpass payments are reserved until the inter-bank settlement has taken place and the amount has landed in the pool account. Defaults to false |
Reservation funds release
By using the above configs reserveIncomingPayments etc.
By default, all incoming payments to a wallet are reserved until inter-bank settlement is completed and the amount has landed in the pool account. This ensures transaction security and consistency. Previously, this behavior was system-controlled with no tenant-level flexibility.
Now, tenants have the option to configure their fund release timing at their own risk, allowing them to release funds at specific intervals as per their operational requirements.
reserveIncomingPayments.duration.cron=cron expression:--specify the time after how much time funds should be released (e.g:/5 * * * this states as Run the task after 5 minutes).
reserveIncomingPayments.duration.seconds= seconds:--specified the time when the funds reserved+configured seconds then the funds will be released.
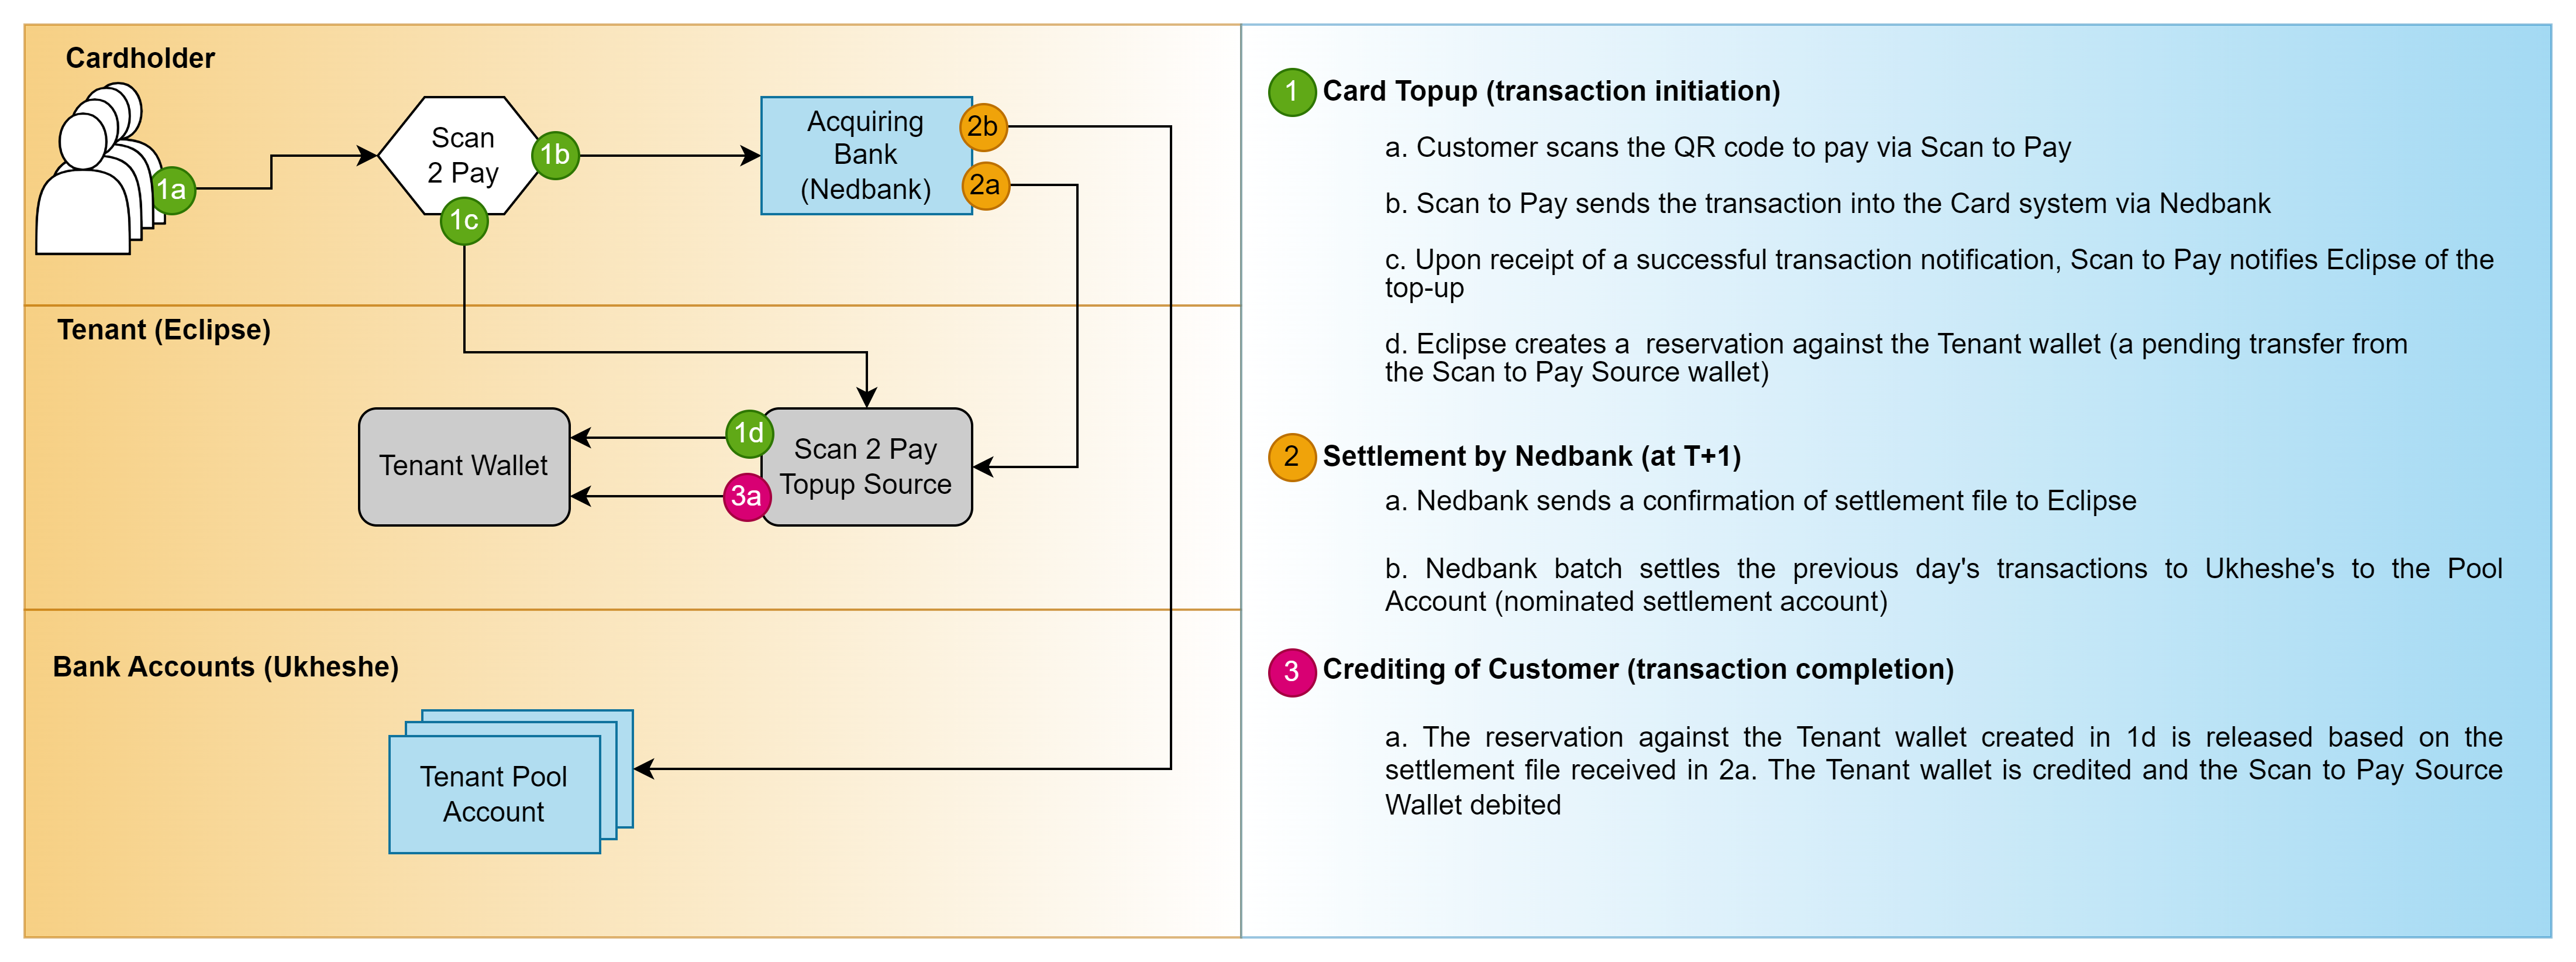
Card & Scan to Pay Flow of Funds
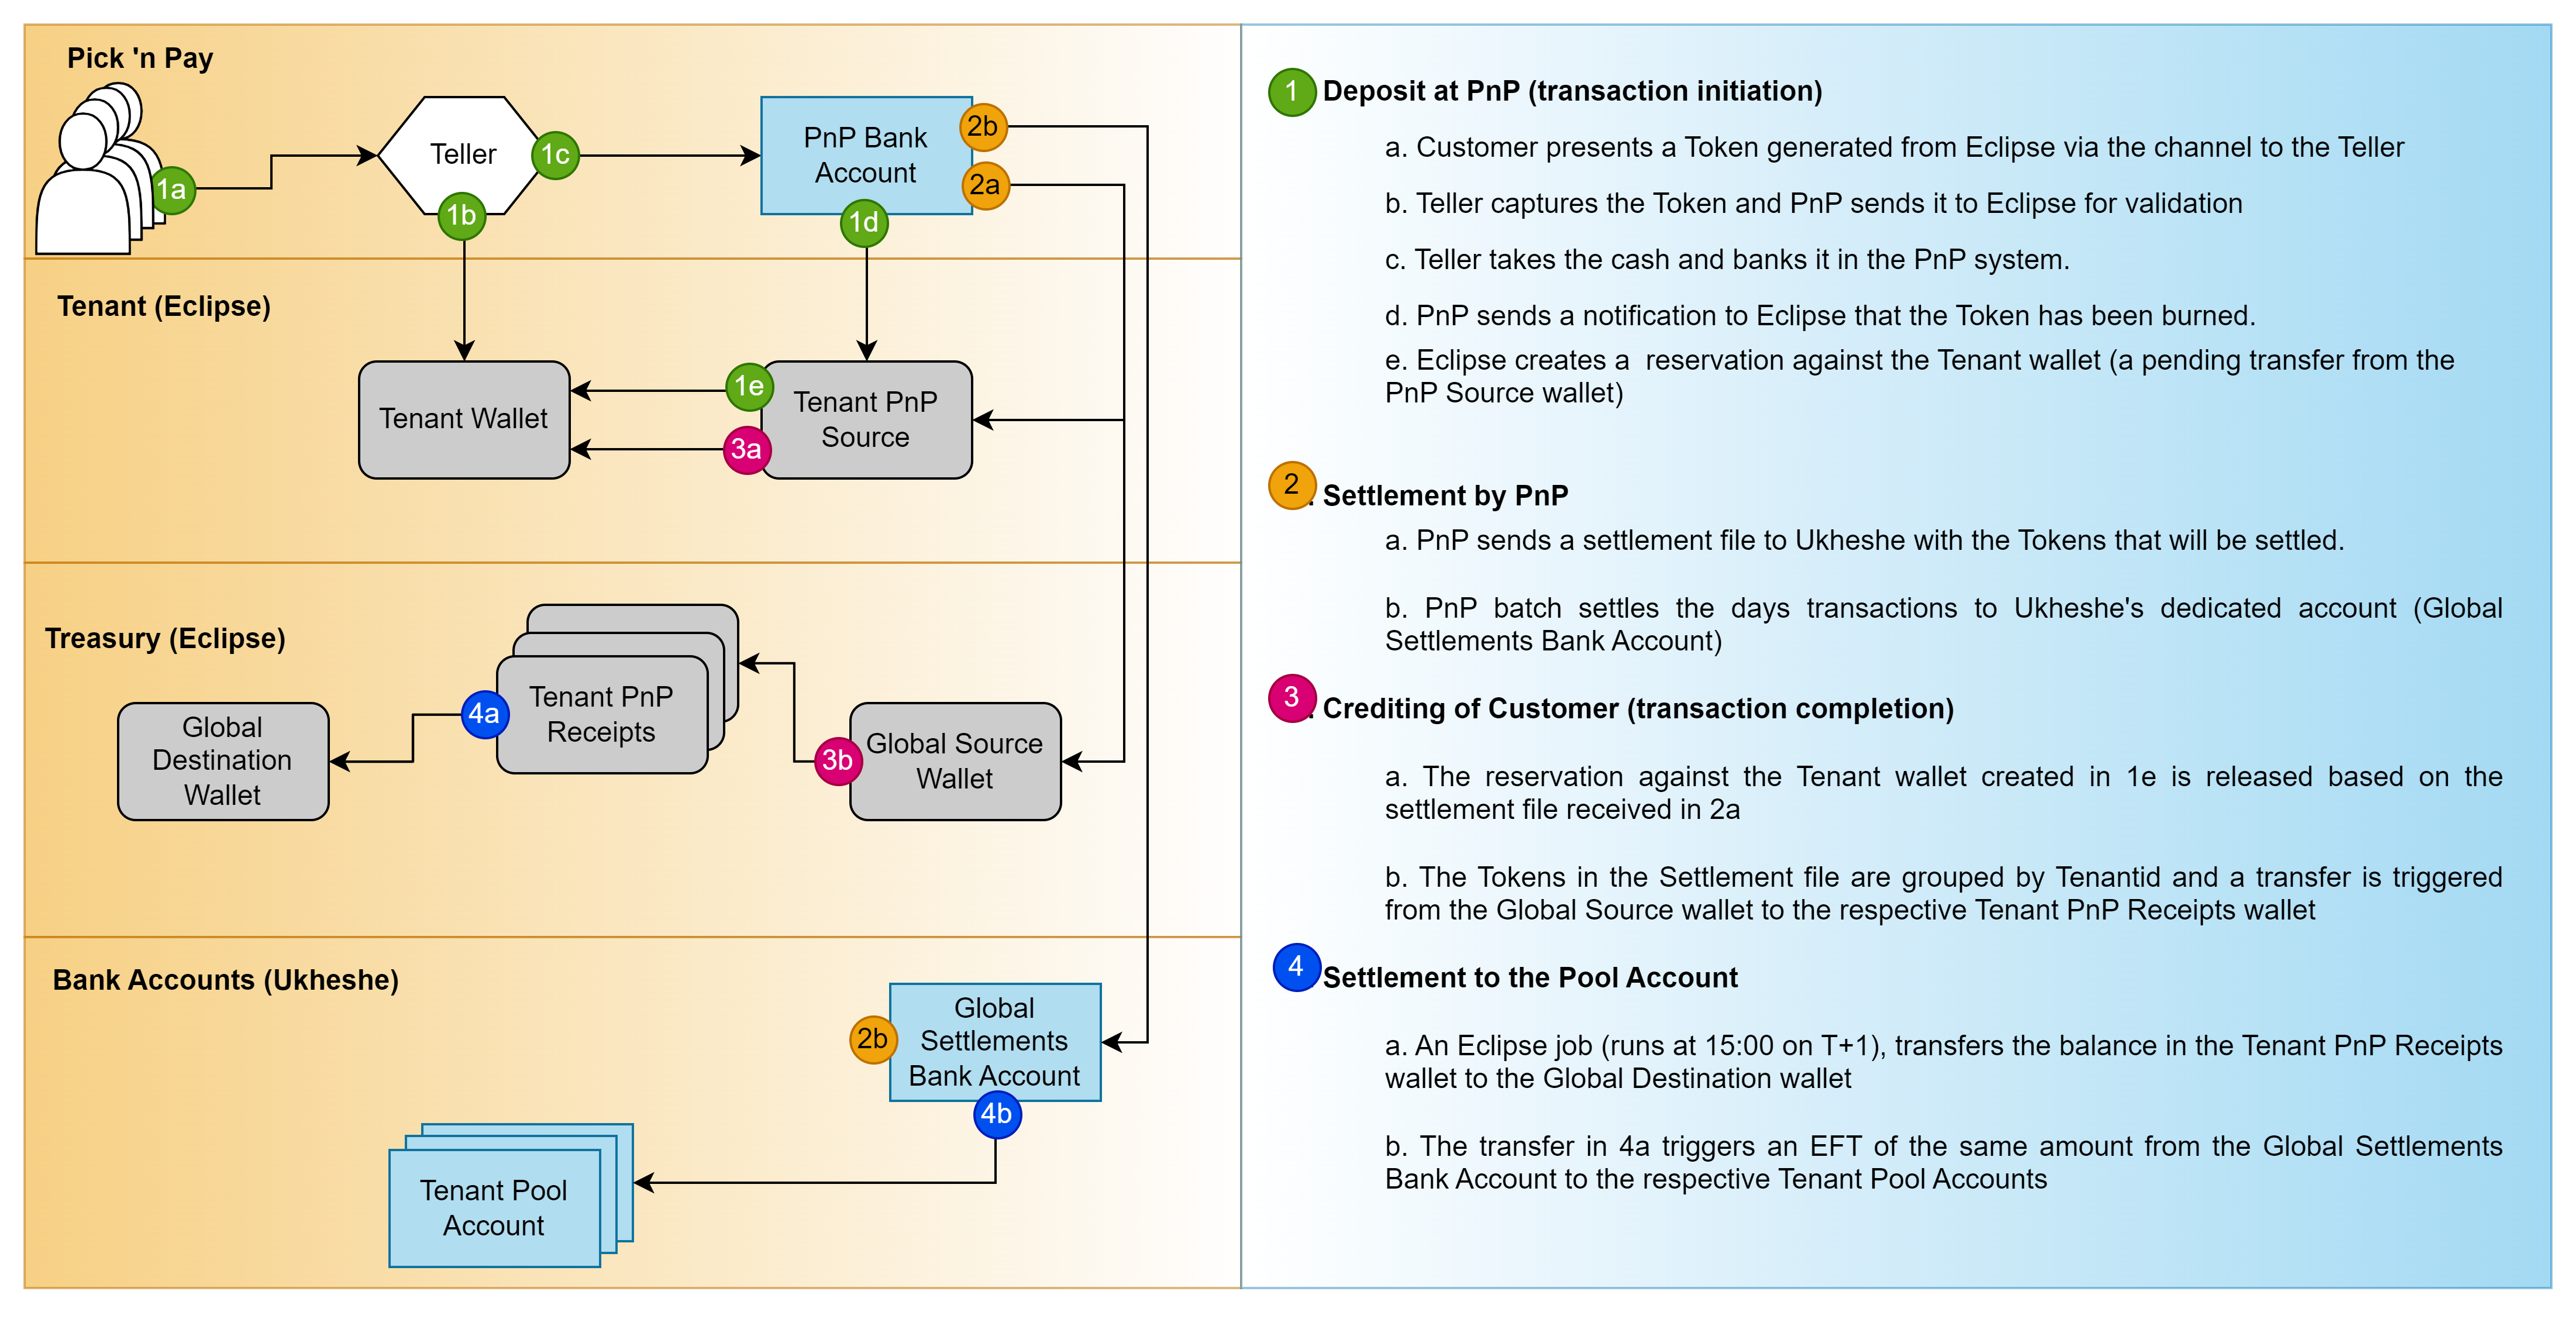
Pick 'n Pay Flow of Funds
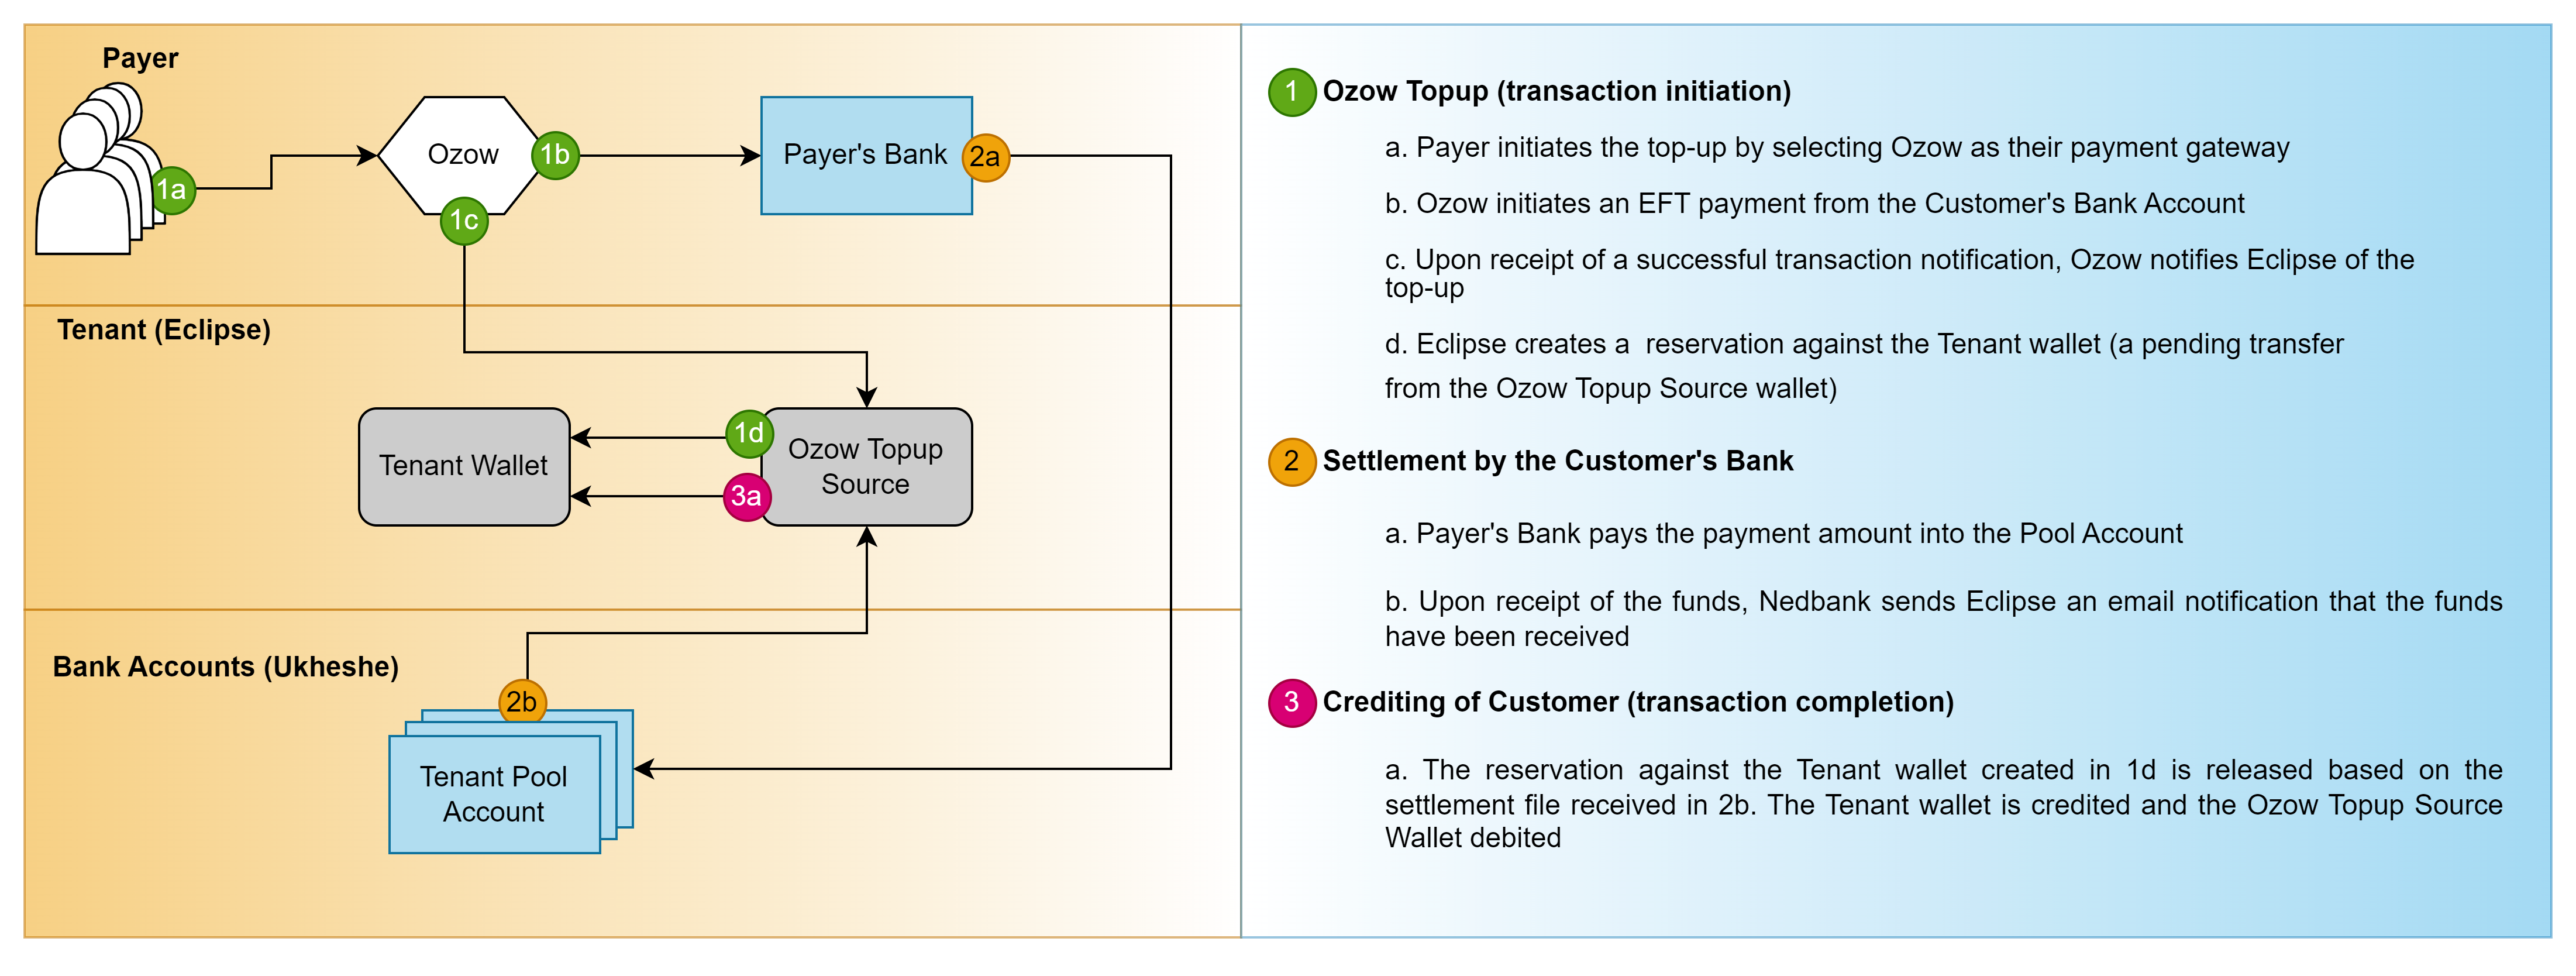
OZOW Flow of Funds
MasterCard/Visa Integration with Eclipse
MasterCard/Visa Pay allows users to store card details in their account and use them to make payments on websites, in apps, and in stores quickly, easily, and securely. Eclipse supports MasterCard/Visa Pay, enabling the secure retrieval of customers' card details from MasterCard/Visa to complete payments using card details as the payment method. This includes payment types like ZA_QR_CODE, GLOBAL_WALLET, and GLOBAL_VAS**.
The process is as follows:
1. The tenant application integrates with MasterCard/Visa Pay by incorporating a MasterCard/Visa Pay button and sending payment requests directly to the platform.
https://developer.mastercard.com/mastercard-checkout-solutions/documentation/sdk-reference/
https://developer.visa.com/capabilities/visa-secure-remote-commerce/docs
https://developer.mastercard.com/unified-checkout-solutions/documentation/api-reference/apis/#checkout-card-on-file-and-confirmations-api
2. MasterCard/Visa returns an encrypted payload containing the card details to the tenant application.
3. The tenant application calls Eclipse for any payment type that supports card details (e.g., ZA_QR_CODE, GLOBAL_WALLET, GLOBAL_VAS), including the encrypted payload in the encryptedPaymentCardData field:
"encryptedPaymentCardData": {
	    "base64EncryptedPayload": "XYZ",
	    "type": "CTP_MASTERCARD"
}

"encryptedPaymentCardData": {
	    "base64EncryptedPayload": "XYZ",
	    "type": "CTP_VISA"
}
- Eclipse decrypts the encrypted payload and processes the card payment as usual.
- The following global configuration need set for MasterCard.
Key: mastercard.pay.config
Value:
srcDpaId={srcDpaId}
checkoutURL={checkoutURL}
clientId={clientId}
consumerKey={consumerKey}
base64EncodedSigningKey={base64EncodedSigningKey}
base64EncodedPrivateKey={base64EncodedPrivateKey} - The following global configuration need set for Visa.
Key: visa.pay.config
Value: base64EncodedPrivateKey={base64EncodedPrivateKey}
- The following global configuration need set for MasterCard.
MasterCard Example Request
To process a ZA_QR_CODE payment using the encrypted payload returned from MasterCard Pay, the request to Eclipse looks like this:
POST /eclipse-conductor/rest/v1/tenants/{tenantId}/customers/{customerId}/payments

{
  "amount": 1,
  "callbackUrl": "https://webhook.site/af4a5c68-90b1-4776-8fee-87578e0f029d",
  "currency": "ZAR",
  "description": "This is MasterCard Pay testing",
  "encryptedPaymentCardData": {
    "base64EncryptedPayload": "ewogICAibWVyY2hhbnRUcmFuc2FjdGlvbklkIjoiMGE0ZTBkMy4zNGY0YTA0Yi43MWRmNzU0MjNlNmVkYWE4MDE3YmExMjgxY2Y3M2FhMGFjNzU1Nzk2IiwKICAgImVuY3J5cHRlZFBheWxvYWQiOiJleUpyYVdRaU9pSmtaV1poZFd4MGMyRnVaR0p2ZUdWdVkzSjVjSFJwYjI1clpYa2lMQ0psYm1NaU9pSkJNVEk0UTBKRExVaFRNalUySWl3aVlXeG5Jam9pVWxOQkxVOUJSVkF0TWpVMkluMC5yVzhTM083MUZENTJuSUU5b290VkNXV1lOQ3Y0WDRlSE8xZzdWUndPLUlGaDM3Yk1zUGEwYVV0cnlXSTB5T2p2RFNxT0d2aXc3Q2p2QkJMeHE2V1U0UHlkWk1ldThVejlqOGRmVTltY0VQY1NDYkstN3ZyZHlQY2xBb3ZGa0Z0eGoya3MycTZLRWVYSF90by02dmV4QUdTNGdEMy1QemVnOVB5akNNRFJpN2lWZldUSk5hN0lPT0o4am1NWGpxbGVhc3lTZHVpMTYwTE9UT0RTaERvLVJZMGo0VlRRU1JVZE1NX19rN2dMQ05zUzhlUWUwOV9FcTdqOWs2bW9EaDQxclhONVZuUDRNY25tNVFZVmRLZzVjazQ5bjJyTnFGTVJRamZ4a0VaTkZkeEJEYjg3ME9KcXBzelZlVldJTkRJV3FRSWVRU2RyN2doQjdxeUpsbVJRdVEuNlBNNmRKdDkyVHRPVW5uZEtEcGtoQS5HbzhZZHlJc1RlcHhiUnVvU3g3ckRyakxsU2Itd1NOeGJpRGNFZXhzOFVhZmpiUTFtXy02UTJ6SEZ6NHllSDJlMlUyeGh3Zl9pSWdCSGY4dVVUNjRSSEQ2czlSSFZvQ0JpcVk4VWVUVmtjRmVIVXFrSU1JZS1iVGNrVFlPVGhRb0hSdFl5WXZuOW9uU3Y5aDZIdFFyckZydE9maE5IenlISk9SREJwdGYyWVFkdlNaNkdWMjNSUnNTdjBvekw3eGFQMERXTlk3ZHIxajVCSVRsWUVmbkJQUWhmOHB4czcxcVhvM2NEbkNjdzJTM0xGUVYwcVFjVGVXQlV4UW1kS2thSHVMQW1rR1RaTDc2VjFDc3FVRnc0T3pSVktoRkRCVHZ2VXZzaHcwd2NQcG1FTkRQYnMxckthdUhKZ3V0aG9fTUQwTmdPUW5qd3VVLU50Q2toY3k4MWJBVHdJTHUzcS1rRDkyTXlLMjJudnEzbk5WZVhOSTgwUjNic09VZkpJMGw0aXRiVVgwTUFvZlNGOTgtNEdpYk9nLmlzMk9ZSWFERmwxWGVBd3JOVzE5X1EiLAogICAiY29ycmVsYXRpb25JZCI6IjM0ZjRhMDRiLjQ0MDU1ZGM5LTkzYmYtNDA1Zi04N2NmLWQxNmUyYzU1YzhhZS4xNzI1MjgwMjU5IiwKICAgImFzc3VyYW5jZURhdGEiOnsKICAgICAgInZlcmlmaWNhdGlvbkRhdGEiOlsKICAgICAgICAgewogICAgICAgICAgICAidmVyaWZpY2F0aW9uVHlwZSI6IkNBUkRIT0xERVIiLAogICAgICAgICAgICAidmVyaWZpY2F0aW9uRW50aXR5IjoiMDMiLAogICAgICAgICAgICAidmVyaWZpY2F0aW9uTWV0aG9kIjoiMDEiLAogICAgICAgICAgICAidmVyaWZpY2F0aW9uUmVzdWx0cyI6IjAzIiwKICAgICAgICAgICAgInZlcmlmaWNhdGlvblRpbWVzdGFtcCI6IjE3MjUyNzgzNjUiLAogICAgICAgICAgICAidmVyaWZpY2F0aW9uRXZlbnRzIjpbCiAgICAgICAgICAgICAgICIwMiIKICAgICAgICAgICAgXQogICAgICAgICB9CiAgICAgIF0sCiAgICAgICJlY2kiOiIwNiIKICAgfSwKICAgIm1hc2tlZENhcmQiOnsKICAgICAgInNyY0RpZ2l0YWxDYXJkSWQiOiJDVldBRGg2VFQzcTBWQlM0UEstN1FRMDAwMDAwMDAwMDAwVVMiLAogICAgICAicGFuQmluIjoiNTE4NjAwIiwKICAgICAgInBhbkxhc3RGb3VyIjoiODc4NSIsCiAgICAgICJkaWdpdGFsQ2FyZERhdGEiOnsKICAgICAgICAgImFydFVyaSI6Imh0dHBzOi8vc2J4LmFzc2V0cy5tYXN0ZXJjYXJkLmNvbS9jYXJkLWFydC9jb21iaW5lZC1pbWFnZS1hc3NldC9ISUdILU1BU0stM3gucG5nIgogICAgICB9LAogICAgICAicGFuRXhwaXJhdGlvbk1vbnRoIjoiMTIiLAogICAgICAicGFuRXhwaXJhdGlvblllYXIiOiIyMDI2IiwKICAgICAgIm1hc2tlZENhcmRob2xkZXJGdWxsTmFtZSI6IlQqKiogVCoqKiIsCiAgICAgICJtYXNrZWRDYXJkaG9sZGVyRmlyc3ROYW1lIjoiVCoqKiIsCiAgICAgICJtYXNrZWRDYXJkaG9sZGVyTGFzdE5hbWUiOiJUKioqIiwKICAgICAgInBheW1lbnRDYXJkRGVzY3JpcHRvciI6Im1hc3RlcmNhcmQiLAogICAgICAicGF5bWVudENhcmRUeXBlIjoiUFJFUEFJRCIsCiAgICAgICJkaWdpdGFsQ2FyZEZlYXR1cmVzIjpbCiAgICAgIF0KICAgfSwKICAgIm1hc2tlZENvbnN1bWVyIjp7CiAgICAgICJtYXNrZWRFbWFpbEFkZHJlc3MiOiJqKioqKiphQGVmdGNvcnAuY29tIiwKICAgICAgIm1hc2tlZE1vYmlsZU51bWJlciI6ewogICAgICAgICAiY291bnRyeUNvZGUiOiI5MSIsCiAgICAgICAgICJwaG9uZU51bWJlciI6IigqKiopICoqKi0qMzgyIgogICAgICB9CiAgIH0KfQ==",
    "type": "CTP_MASTERCARD"
  },
  "externalUniqueId": "TEST9625871144",
  "paymentData": "8912726043",
  "type": "ZA_QRCODE"
}
Visa Example Request
To process a ZA_QR_CODE payment using the encrypted payload returned from Visa Pay, the request to Eclipse looks like this:
POST /eclipse-conductor/rest/v1/tenants/{tenantId}/customers/{customerId}/payments

{
  "amount": 1,
  "callbackUrl": "https://webhook.site/af4a5c68-90b1-4776-8fee-87578e0f029d",
  "currency": "ZAR",
  "description": "This is Visa Pay testing",
  "encryptedPaymentCardData": {
    "base64EncryptedPayload": "ZXlKcmFXUWlPaUpOUVZBelVVUXhUVlJXVjB4S09UbExNRUpCVURFelRucE5TekpvTkhadlowcFlTakZSY0hBeWNWOWpSemcxTTFSSklpd2lZV3huSWpvaVVsTXlOVFlpTENKcWRHa2lPaUphVjFsNldrUkJNbGxxVlhSUFZGbDZUa013TUU5WFZYaE1WMGt5VGtkRmRFNVVhM2hPVkVVeFRYcEZNVTFVVVRVaUxDSnBZWFFpT2pFM01qVXpORFl3TURSOS5leUp6Y21ORGIzSnlaV3hoZEdsdmJrbGtJam9pTmpFMk1XWXdOR1l0T0dVNFppMWlZbVJrTFRZMFlqTXRNVEZqWmpkbFpqVTFOREF5SWl3aWMzSmphVlJ5WVc1ellXTjBhVzl1U1dRaU9pSmpOek5tTW1RME5pMDBOVGN6TFRSalpXRXRZVGt6WlMwMU5UWTNOamN4TldFeU16a2lMQ0p0WVhOclpXUkRZWEprSWpwN0luTnlZMFJwWjJsMFlXeERZWEprU1dRaU9pSXpPVGt6WkRZNU1pMWhObVJsTFdNd1lXVXRZMkpoTkMweFkySTNOek5oT0dNeU1ESWlMQ0p3WVc1Q2FXNGlPaUkwTURBd01EQWlMQ0p3WVc1TVlYTjBSbTkxY2lJNklqRXdNREFpTENKd1lXNUZlSEJwY21GMGFXOXVUVzl1ZEdnaU9pSXhNaUlzSW5CaGJrVjRjR2x5WVhScGIyNVpaV0Z5SWpvaU1qQXpOQ0lzSW1ScFoybDBZV3hEWVhKa1JHRjBZU0k2ZXlKemRHRjBkWE1pT2lKQlExUkpWa1VpTENKd2NtVnpaVzUwWVhScGIyNU9ZVzFsSWpvaVUwOUpSRXBKVTBvZ1NVaEVWMGxWSWl3aVpHVnpZM0pwY0hSdmNrNWhiV1VpT2lKVFQwbEVTa2xUU2lCSlNFUlhTVlVpTENKaGNuUlZjbWtpT2lKb2RIUndjem92TDNOaGJtUmliM2d1WVhOelpYUnpMblpwYlhNdWRtbHpZUzVqYjIwdmRtbHRjeTlqWVhKa1lYSjBMemhsT1RVMU1UUm1ZelkyTURRMk1qWmlNRFkyTldNeU1EVTVOREkyWkRFMFgybHRZV2RsUVVBeWVDNXdibWNpTENKaGNuUklaV2xuYUhRaU9qSXhNQ3dpWVhKMFYybGtkR2dpT2pNek5IMHNJbVJoZEdWdlprTmhjbVJEY21WaGRHVmtJam94TnpJMU16UTFPVGs0TkRBd0xDSmtZWFJsYjJaRFlYSmtUR0Z6ZEZWelpXUWlPakUzTWpVek5EWXdNRFF5TVRFc0ltMWhjMnRsWkVKcGJHeHBibWRCWkdSeVpYTnpJanA3SW1Ga1pISmxjM05KWkNJNklqWm1ZalZtT1RWbUxXRmhNV1l0TmpoaE9TMHdOekkzTFRFMVpEZGhPVEE1T1Rnd01pSXNJbU52ZFc1MGNubERiMlJsSWpvaVdrRWlmU3dpWld4cFoybGliR1VpT25SeWRXVXNJbkJoZVcxbGJuUkRZWEprVkhsd1pTSTZJa05TUlVSSlZDSjlMQ0p0WVhOclpXUkRiMjV6ZFcxbGNpSTZleUp6Y21ORGIyNXpkVzFsY2tsa0lqb2lUVXBGWm1WSllYbHFlR1pqTm10NFEzWmhXbWxxYlVKSWVEUnZUWHA2Vm5WaFlWbHVTSFF4V1hGd1FUMGlMQ0ptYVhKemRFNWhiV1VpT2lKVEtpb3FLaW9pTENKc1lYTjBUbUZ0WlNJNklra3FLaW9xS2lJc0ltWjFiR3hPWVcxbElqb2lVeW9xS2lvcUlFa3FLaW9xS2lJc0ltVnRZV2xzUVdSa2NtVnpjeUk2SW1sa2N5b3FRSGx2Y0cxaGFXd3VZMjl0SWl3aWJXOWlhV3hsVG5WdFltVnlJanA3ZlN3aVkyOTFiblJ5ZVVOdlpHVWlPaUpWVXlJc0lteGhibWQxWVdkbFEyOWtaU0k2SW1WdUxWVlRJaXdpYzNSaGRIVnpJam9pUVVOVVNWWkZJbjBzSW1WdVkzSjVjSFJsWkZCaGVXeHZZV1FpT2lKbGVVcHlZVmRSYVU5cFNUSk9lbEYzVG5wak1VNTZXVEJPZW10NVRWUkpNazE2VVRGT1ZFMTZUVlJWZDA1cVVYcE5SRkY1VG1wQmVFMTZZekpPYWsxNVRrUmpNazVFWnpGT1dIaEVWR294YW1KSGJHcGhNMUoyWTBkR05VeHVWbkpoUjFaNllVZFZkV050T1dwaE0wMXpTVVU0T1ZKVldsVlJNamw1WTBOQ1ZtRXlhR3hqTW1oc1RFTkNUVkJWY0haaFIwWjFZbTFXZWxsdVZubGFlWGRuVlRGUk9WSXlSakZrUjFaMVdubDNaMUY2TVdGUlUwbHpTVzVTTldORFNUWkphM0JRVlRCVmFVeERTbXhpYlUxcFQybEtRazFxVlRKU01FNU9TV2wzYVZsWGVHNUphbTlwVld4T1FreFZPVUpTVmtGMFRXcFZNa2x1TUM1clNFMUlXVWRIZG1acFRXSTNaSFpYYzB4cU0zaFNOWHBLWjE5VlRDMXRibTVpY2pKVE1tTkpkVkpFVFZwRFVGRjZNSGhVVDJGa1RHRlBOMW8xYW13eGFVMDNUVGg2YmtsU1R6WlJSVkkyZWpGeWQxTmhjamw1UzJWUlgzUjBhRTlCZWxFemFVZHliMnQ0ZHpWNWJXSmlNbTl1VjNoaGMyVjZlVWRXY1VORlJDMUJYMUUyVkdGeVdIVnlja1JLVERONlltOXNRV2xSUlhodVgzb3RXRXhvVUZoQ2VYZFVPR3hYY2tsTE4zaGZabVJQZHpoTmFqZEZZVzR0WXpsck9ETnVXbDlsVUVwamFXOURlSGMyZUc0NVYzZFdlbEY2WTFGVVJrTjFjVlZWVURsNlJEZFVkVGxCVTBJdFpsVjFXbGx1YUVZMGFVcEpZekpUYmxGR1RHWkxSVWt3TTJ4UVlVaERhV3RNWVZoM1ZubHZNV3RWT1VselNWOTJVSFl0V1dwVWQyTlFSMjgxWTAwMGJFNTFVRE5PYjBGRlUwWk9Xa0pHT0d4YVoxQlJTMlpGVWtNdGNXUlRVWFp1Y2tKQ2JUYzJXSGhmTldoTVVreHhNa0pKYkhBeGMwaGpObVZXWlhKNlUwSkNjVmxxVVZGNk5VZFNSMlprWkZCMU0zVjBjVTlLY1RaSlZGZG5OVlJmWlhsTlNGazRkbk5WVFhoSllXMUtSMjkwWVdka05VNDJaREl5U0dsMFdWUXRkbHBNVmtOMWJsUTVWSFpYYVdsS1ZFRm5hbWRSZEZWSFQyMTVlRk5PVERGU1ppMVNhUzFKV21kZlRHWkZWM2xQV1c1U1VXeEllWEkwUVhkRE1tTnFYM014VWxSV04ySmpOVTh5V25ka1dFTlhhekV3Y2kxMFgzY3hjM0JJUlc0eWJIbFZSMkZYYjFOVlZ6QkpOVGhuUlhoTE5tNUhaa056Y0ZkeFRVWXROakIzYUROUVZYQnJXRTgxWmxreVh6QmtNVEZhUVMxTVNUUndabmxXWVUxWlRtWjZlaTE2V0VOMVZuUmhXRmxETlV0VmNuQnRWbXhmYUcwNVZVaFhNa1kxUkhkM2RreHJYM0JqVERWTmNGWmxVelZQVTNSRldXSkZaemxaUkRsS1JuZDRha1Z4TmpWRlQyMU5VRk5KVldWbk1ERjVNbFpFWHpCT1dISnRjbEJIYXk1RmRHaGFWMkZFZW00eE56VnBTbEZqTGtaUWRFRXpNVU5wWVV0VmVtbFRkR2d5ZDNKVFUyZGtkVFZVUlVWVVdVWlZha1JwV2s4NGJIRlVheTFUVTFwbE1rZ3haMkZMVlVnMU1XY3hNa2t3Y1ROSGRHZHJVVEZmTjJKSGN5MW5iMUI1U0VKSFF5MUZTVE56WlRrd1dGUTJUMTlEV2poU1pTMXJjMkZoTjE5dE4zbHRNRGt6YkZadU9HOUtkekJPYlc5b09IbzROa2t3Y1Vwak9Ha3RZVUV0UlV0d2FqSklXbVJHYlRWcVQwb3lkVTVoY2tWeWRuSTJTamhOVEhoUWVWVnZTbDltVUV4U1oyOWhXWEptVjE4ek4wbGFOVzlSWTI5R1QxZDNVVFV6TWpsa1ExaDZaV015V0dsRVNsWlFjazFETTJSa1UyWkJjVGRuUkZadFExaEpNVW80YlMxVFIwNU9hWHAwZDFGaWFtTmpPSHBoU1RkSVJGRnJhaTFaWVU5SlIyd3dUM00yWmxSVmFFZGxWRlo0UjNac1JXVXRkMVJZTVRWc09DMVBaVk13YlVOUk1VOHpOVmw1VWswMlkxWkVkV3g0TVVneU1GWndlSEo1TUdsdWIycG5aekpZVVZaNmR5MTVhR1J4V1dsZlJqaFhaRUZIUWpac2JISlRSbTVuWkZwWVZFbGZZblZZU0RKTWFHcFBNV2hWWTNWM1Z6aHhNSGhXYTFoMlUwc3lXRXRuTTBkelZrcDVaRXhrTFVScGVFVm5aM2hQTUZGTlZEQmxlVmh4ZURWMmNFMVFSemh0ZEhreFJHb3hRVzVYTUdOVFNGOUlOMHhMT1MwMGFIRmtRekJxU0drMkxXdHlaamg2YjNkUVZHaDVhR3hIVTA1RU4wOUNVMmhsYUhWWU1YTklXRUpSTlZSSlNsRlVUVkpSVjFWSFJsZHVTMmxaYUdVMU5WcHhhME50VTB3emVWUmxkbkJPVjJsV01VdHlabkJYTjFkRllXaGtlRU5wZURWMWRqZFFUM0ZNWkUxWGFIZzNVR2hyTVhsSFgzRnJlREU1Y1VWS1UyOTZXbFJMYW1OTFVqTmtVVk5NZGxsdWNWWkhkall5TmpGVFVHdFVSVlExWVZvNWEzWnBNV3MwTW1SRE1sOVdXRWcwWjI5TU9EVnVlRVZ3VFhSaVFVMUNSVTFsV0RaM2RrdDFUbnB6V25KbVIzcE9XalZMZGxaa1RFZEhaemc0ZFdKalNYQlVObkp2VXkwMmRIUTRhMnMzV0ROSVpIUTNRWE5JU25CdWRUZEZibXh4Ym1GbGVsVnBRVEozVjBFdU5WaHhialI0UW5kUGVFRmljMWN3TjA0ek5FcDFVU0lzSW1GemMzVnlZVzVqWlVSaGRHRWlPbnNpZG1WeWFXWnBZMkYwYVc5dVJHRjBZU0k2VzExOUxDSnBjMGQxWlhOMFEyaGxZMnR2ZFhRaU9tWmhiSE5sTENKcGMwNWxkMVZ6WlhJaU9tWmhiSE5sTENKMGFISmxaVVJ6VDNWMGNIVjBSR0YwWVNJNlcxMTkuVmNNRmowNkZXN1RiNmNVLVhYVXg3UGJBTmhUbzh2Z1FJZXMyeUFjdmtxdXZtend4eXJDZ0xaTmNRdEFYZ3VWOHozZkxhbENQX2E1aXlYQVdRZDdzUjh2SE9OYWlWMGh1UmNsLUkzSkl3Q2NOQUl6bTF5ajdZT1dTcXVHX294ZHFVY00tRDRUN08zXzhaVjItRUdSb25qV1RUX3F4d1BNQ3dsVXlMaWZucDJQRWkxNmo5aExvcDBfN2Nid3pJME85X1VvOWdYOU1qOWpJY1JNWXZUdEx6cHRabGtuaUhVdXVMWFREdU51aFdheWRjN1pzOS1PT0plUG9xT3Q3cld1TUM1RkJNd1QyTWNvMGpsaXNYdGxPQ3N1cVRJcVBpY1NyOURxeW1IWWVhVzRYVUkwOUMtZVBuMm05VEVJUDJudThVSlFpV2pSdzljV1JWQWR3ckthYmJn",
    "type": "CTP_VISA"
  },
  "externalUniqueId": "TEST9625871144",
  "paymentData": "8912726043",
  "type": "ZA_QRCODE"
}
Updated 14 days ago