Customers
This tab will contain a list of the customers registered on your tenant. The search input box can be used to locate a customer profile on certain customer information. You can go into a customer profile be clicking on the customer record which will open the General customer view.

Customers
If a customer is onboarded manually you can just click on the plus icon and manually complete the customer information
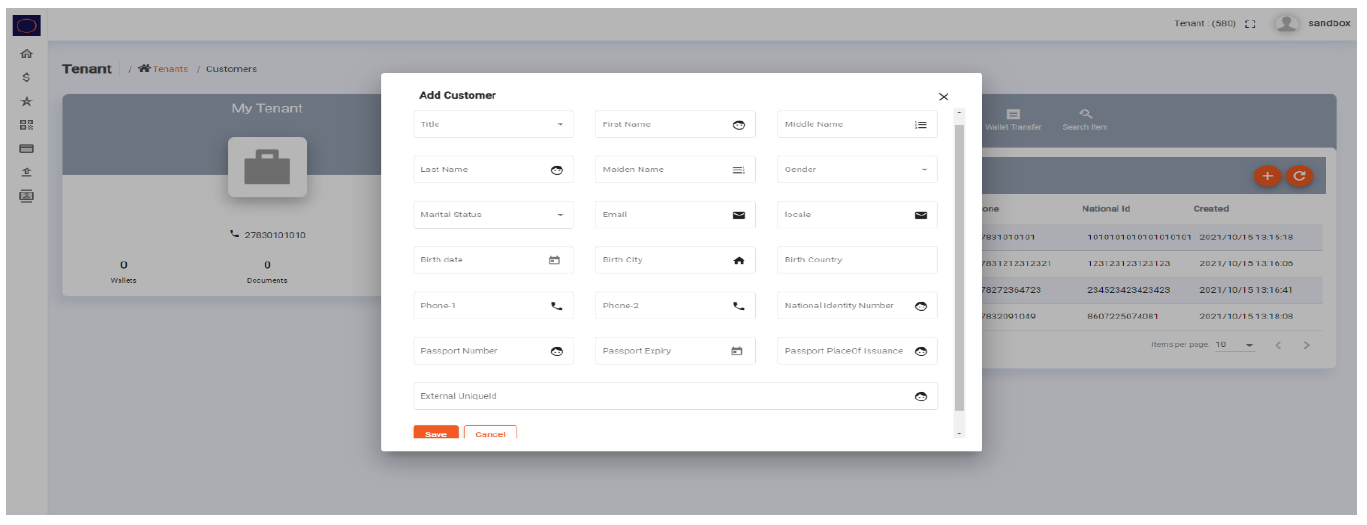
Plus Icon
General
This page contains general customer profile information. If you edit any information, make sure to click on the save button to record the changes.
Addresses
Address information related to the selected customer profile. More than one address can be added if required.
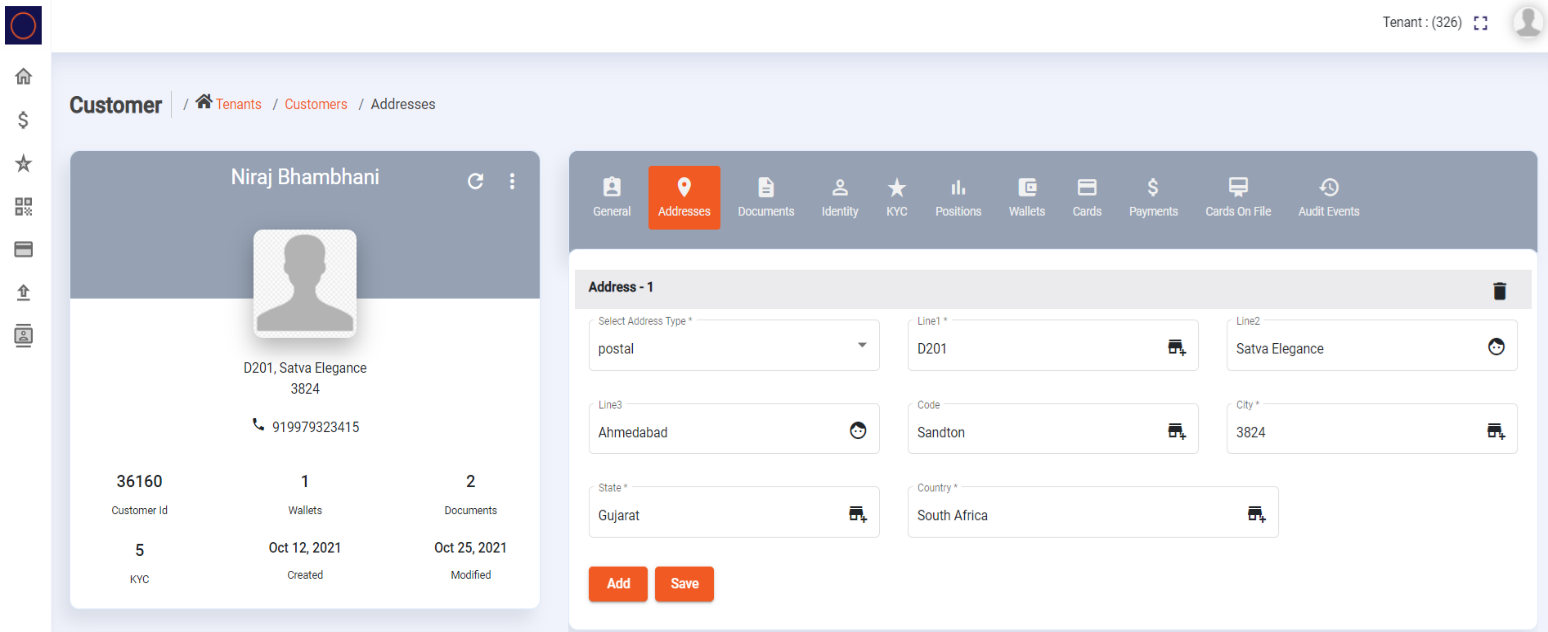
Addresses
Documents
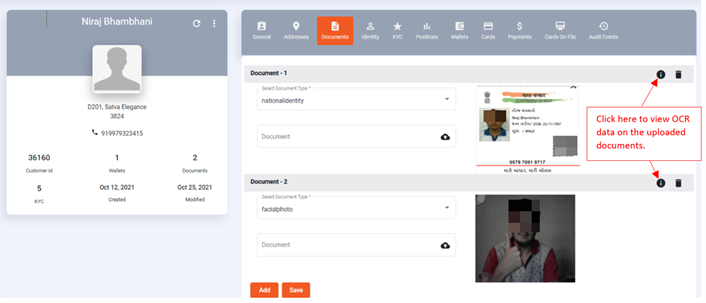
Any supported customer documentation will be shown on this page. For example, for KYC this will have a copy of the customer ID/passport/driver's license and most probably a selfie image. Documents can be updated and manually uploaded if needed:
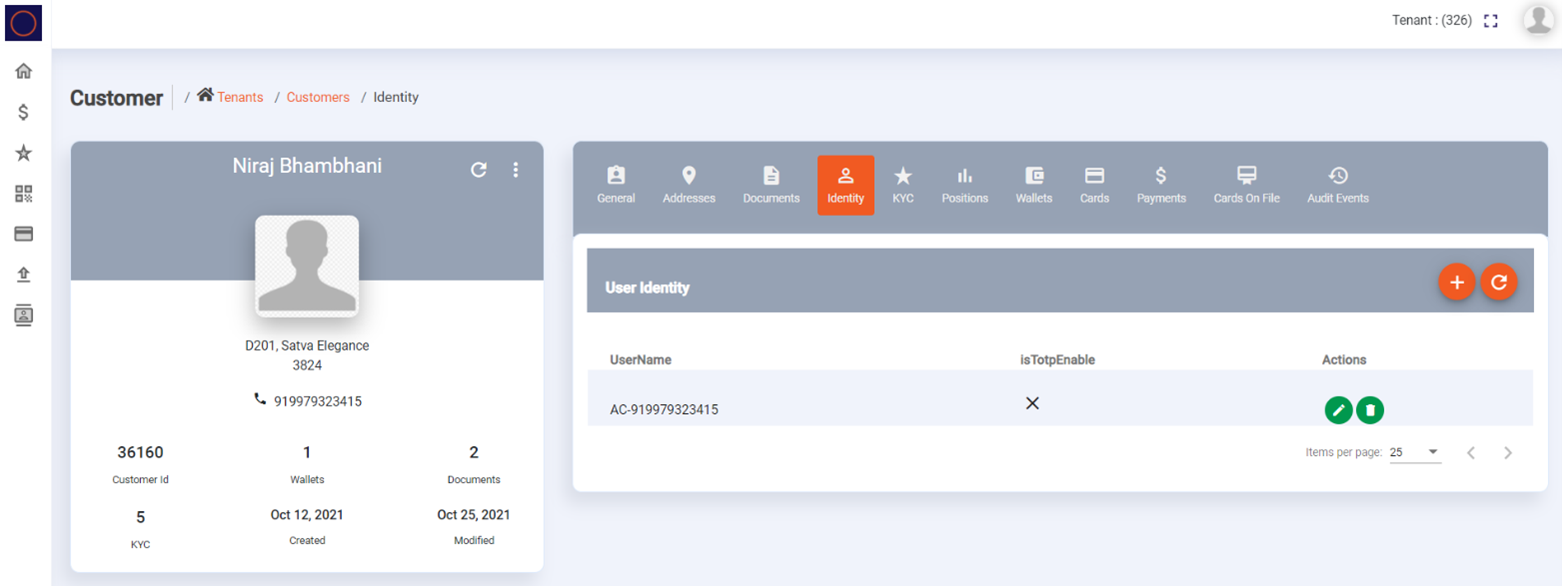
Identity
This is mainly just the unique identifier associated with the customer (usually the client’s mobile number with a prefix).
KYC (Know Your Customer)
This page will contain information about the KYC (Know Your Customer) verification. It will be indicated which KYC information was validated and has passed verification. A combination of liveliness and compliance checks are done before a client is allowed to have a wallet:
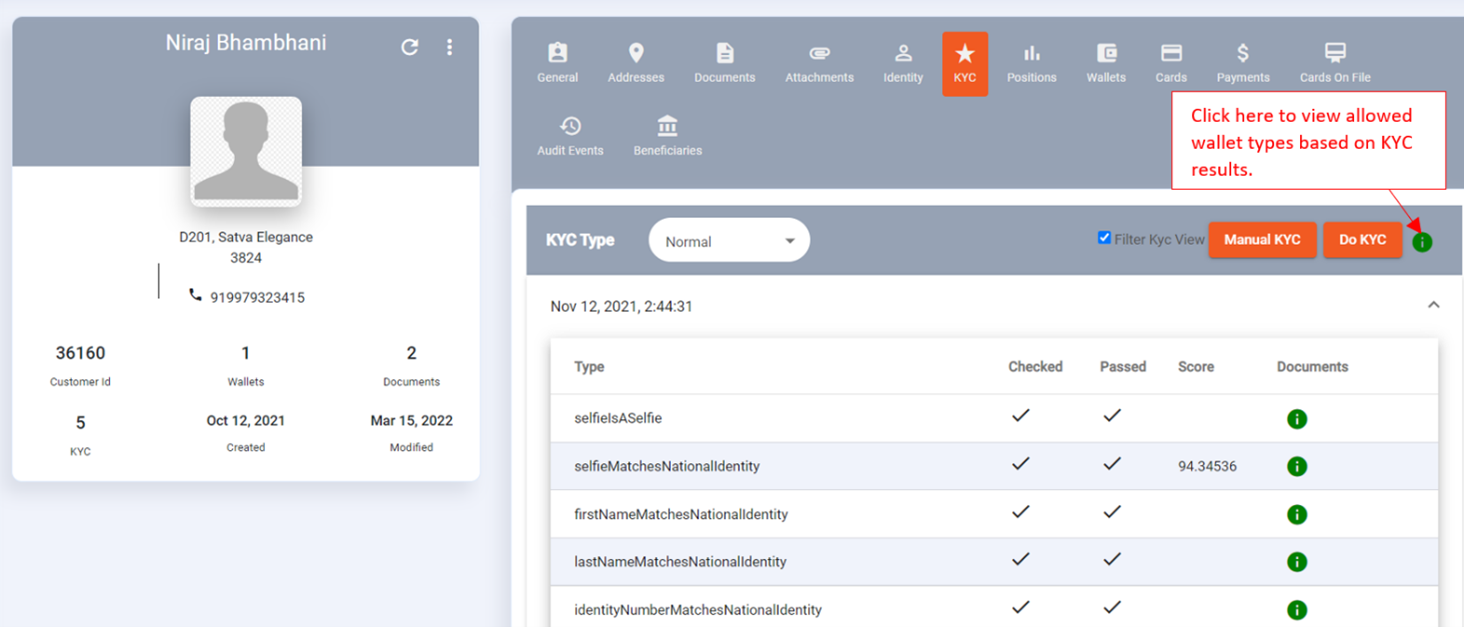
Manual KYC
This function can be used in edge-case scenarios (Where the OCR did not read characters correctly on clear documents) or when a customer’s identification documents are not clear enough for the OCR. An admin user must make sure the information and documents supplied are accurate and legit before doing a manual KYC:
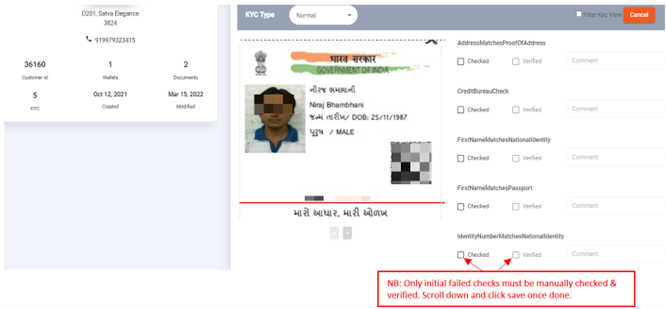
KYC Verification
This function serves as a helpful tool for tenants needing a secondary review to validate user-provided details or in cases where the OCR fails to capture all information from uploaded documents. Admin users can ensure the accuracy and legitimacy of information and documents before deciding to accept or reject a KYC application. A KYC ruleset needs to be established to enable wallets in a BARRED state for the tenant, facilitating the use of this functionality.
Upon initial login, the landing page defaults to the Customers tab. To commence the process, the admin user simply needs to access the KYC Verification button to begin their verification journey.

After redirection, the Admin user lands on the global verifications screen, equipped with a status filter allowing sorting by Pending, Accepted, or Rejected applications. Additionally, a search-by-date filter showcases users created within a specified timeframe. If the ratify result ID is available, it can be directly used for the search.
Initially, all applications remain in a Pending status until reviewed by an admin user, who then updates the status accordingly. Once updated, selecting a specific status filter will display only those applications aligned with the chosen status, refining the display on the screen below.

The next step for the admin user involves clicking on the symbol within the Actions column to access the details page.

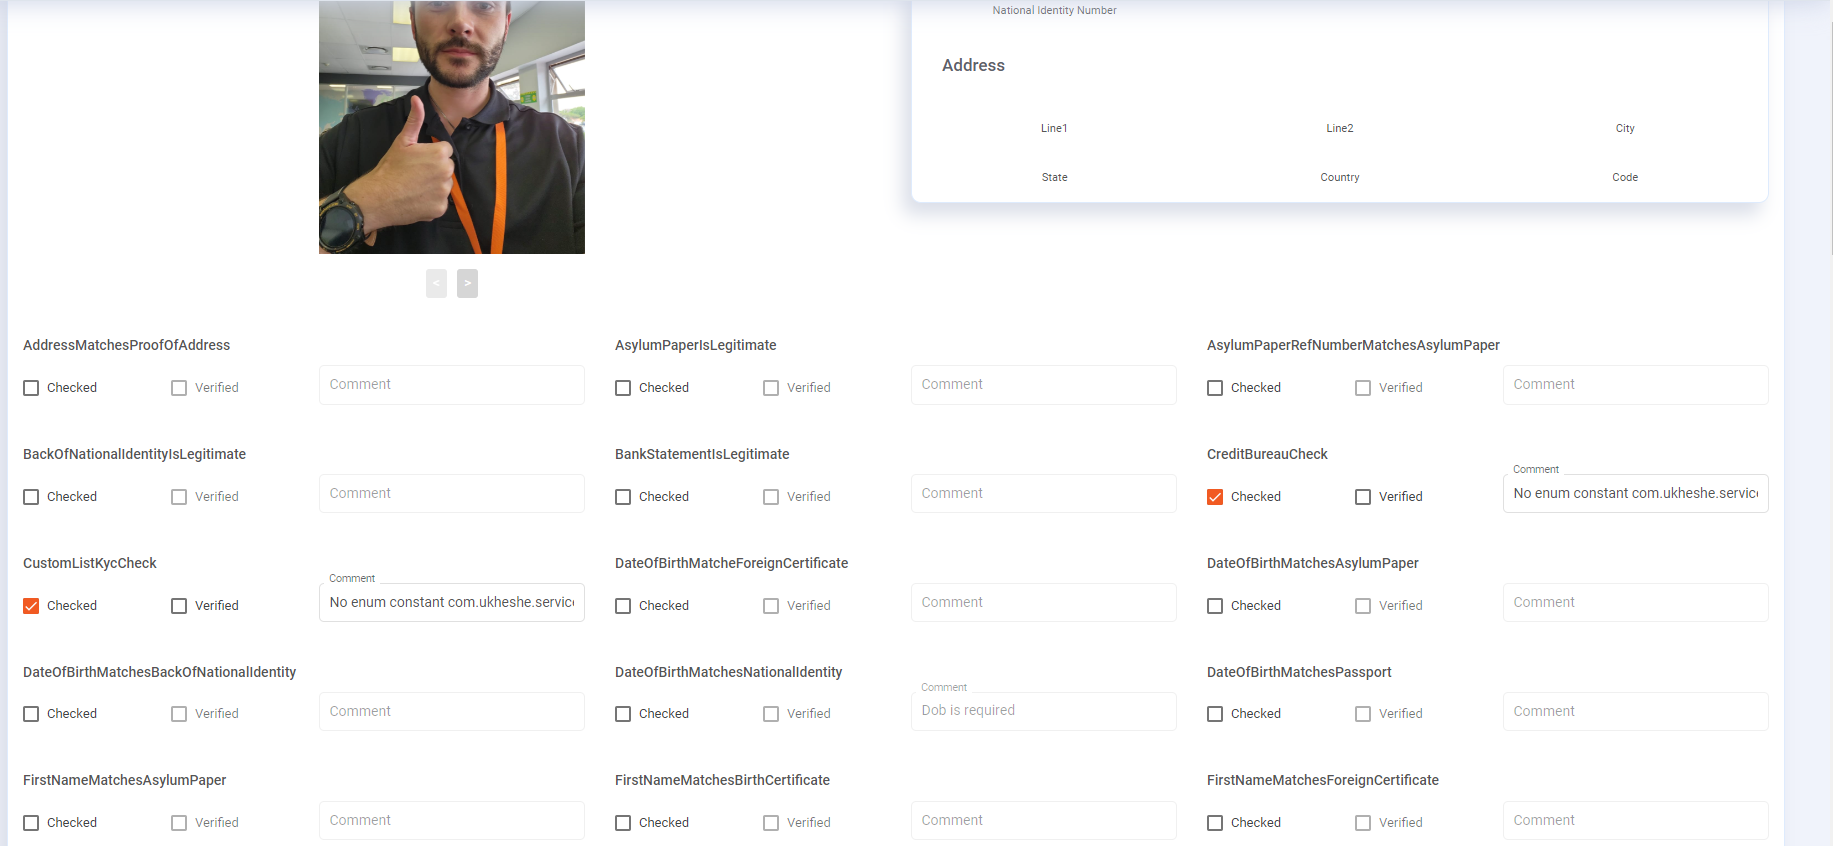
The Admin user can proceed to verify the conducted KYC checks and check off the Verified box to indicate completion. Additionally, they can add comments to individual text fields if necessary during this verification process.
The admin user should scroll to the bottom of the screen to choose the application's status. If satisfied with the checks and documents, they set the status to Approved. Tapping the Save button adds a new KYC result to the user's profile, marking the verified KYC checks as Completed in the KYC result table. However, if the checks aren't verified, they display an "x" (not passed) in the KYC result table.
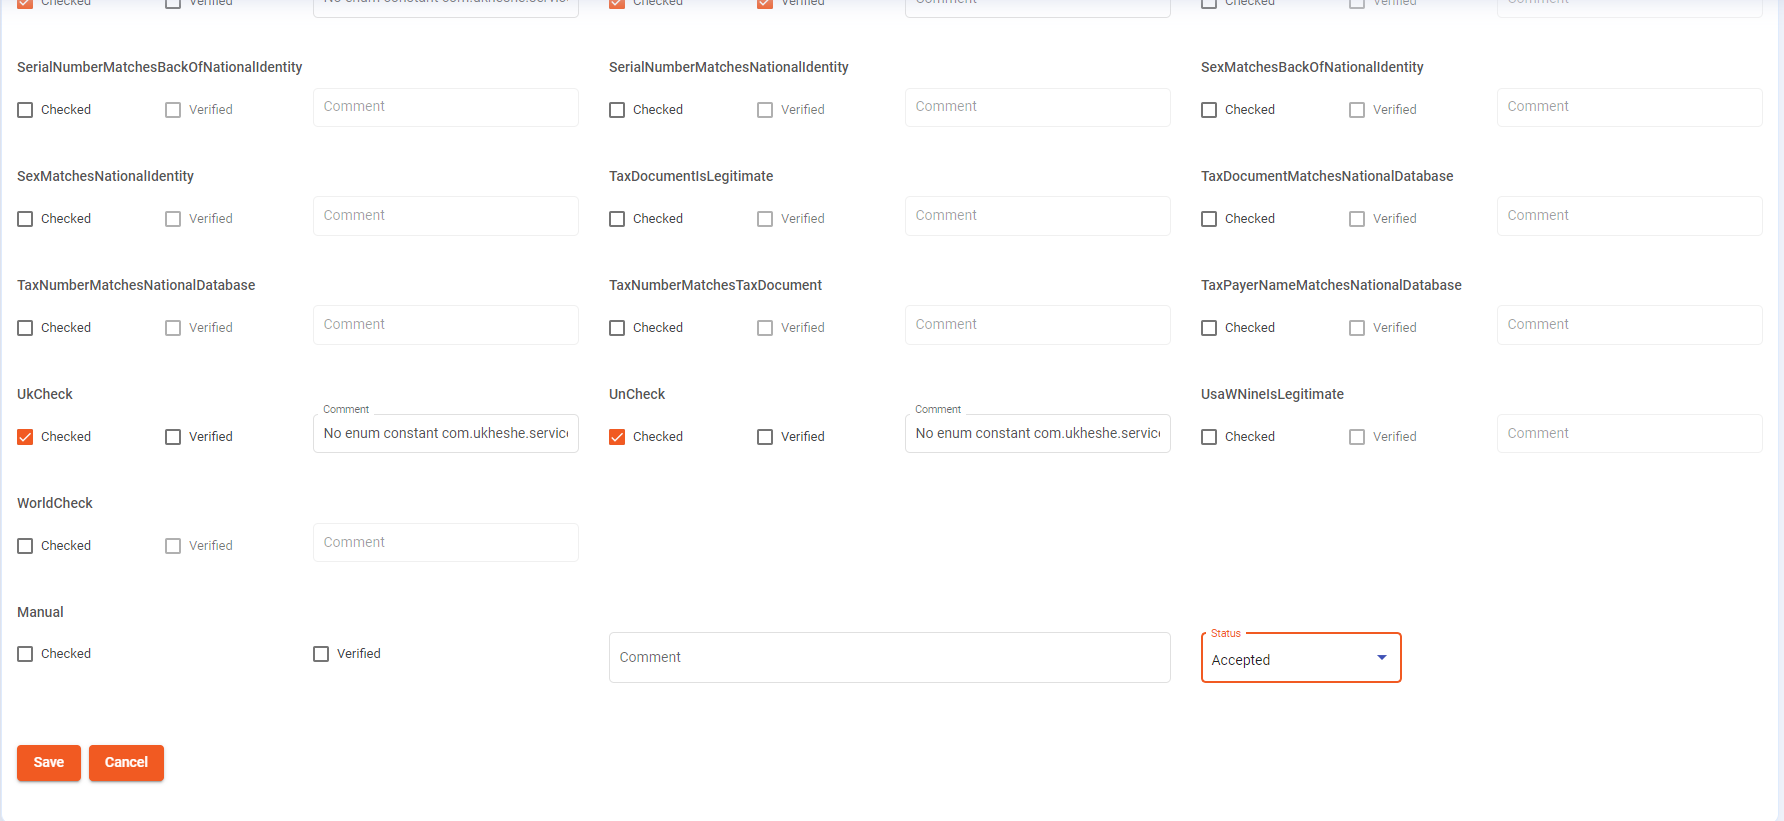

Should the admin user opt to Reject the application, even if the KYC had previously passed, a new KYC result will be generated for the user. Consequently, this action will BAR any wallets that the user might have already added or created.

 The Admin user has the option to leave an application in a Pending status, without taking any action. Applications previously Rejected or Accepted can be modified to any other status as needed, at any point in time.
If a Rejected application is later Accepted, and the user possesses wallets, these wallets will be UNBARRED. This holds true whether the wallet status is set as BARRED through rejection using this method or manually adjusted by another admin user.
Note
To utilize the KYC Verification feature, the admin user role (LEVEL_1, LEVEL_2, LEVEL_3, TENANT_SYSTEM, etc.) must be configured at both global and tenant levels. Access to the KYC Verification functionality requires specific permissions, which are contingent upon the tenant's setup.
This feature is not activated by default. Please contact the Ukheshe team for assistance in enabling this functionality within your tenant environment.
Below is the set of permissions necessary for admin users to use this functionality:
Address.READ.Allowed
Attachment.READ.Allowed
BarWallet.WalletType{digitalwallet}.UPDATE.Allowed
BarWallet.WalletType{virtualwallet}.UPDATE.Allowed
Card.READ.Allowed
Card.UPDATE.Allowed
Customer.READ.Allowed
Document.READ.Allowed
Organisation.READ.Allowed
Ratify.CREATE.Allowed
Ratify.READ.Allowed
UnbarWallet.WalletType{digitalwallet}.UPDATE.Allowed
UnbarWallet.WalletType{virtualwallet}.UPDATE.Allowed
TenantConfig.READ.Allowed
Wallet.WalletType{virtualwallet}.READ.Allowed
Wallet.WalletType{digitalwallet}.READ.Allowed
Wallet.WalletType{digitalwallet}.UPDATE.Allowed
Wallet.WalletType{lockedwallet}.READ.Allowed
Positions
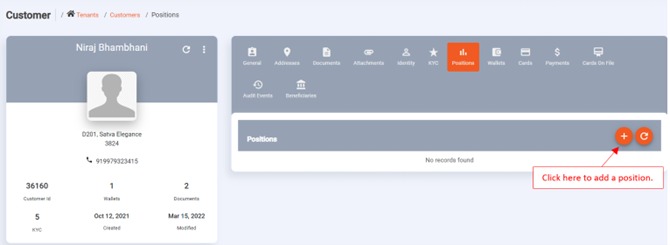
Under this section, you can view or create a client’s position under an organization:
Wallets
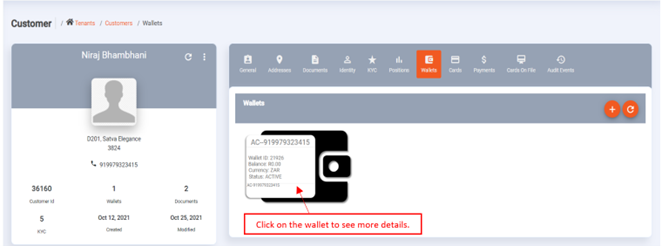
Click on wallets to view a customer’s wallet/wallets, a wallet exists or can only be created if clients passed KYC. This can be a pure digital wallet or a card wallet. Each wallet has its own wallet ID and Friendly wallet ID/Unique reference.
Wallet Status Meaning
Below are the meanings assigned to each of the different wallet statuses:
- ACTIVE = Can be used
- BARRED = Wallet cannot be used due to possible fraud or similar investigation
- CANCELLED = Is deprecated and cannot be used
- LOCKED = Is blocked from use but can be customer-controlled
- PENDING = Wallet cannot be used due to outstanding verifications
Wallet Status
Below are the different statuses the wallet could be assigned at any given time and the corresponding values:
- ACTIVE = 1
- BARRED = 2
- CANCELLED = 3
- LOCKED = 4
- PENDING = 5
1. General
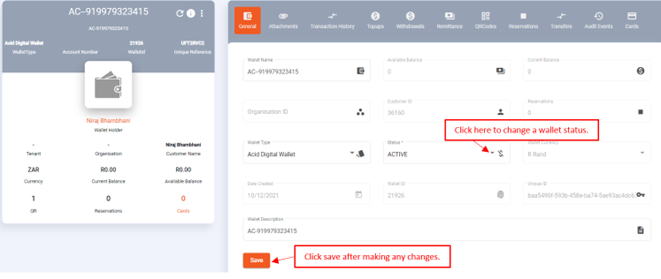
Once the wallet has been clicked more information is provided e.g: The wallet name, balance, wallet type, wallet status, wallet currency, etc. In an event of fraud or suspected fraud change the wallet status to locked to avoid further transactions.
2. Transaction History
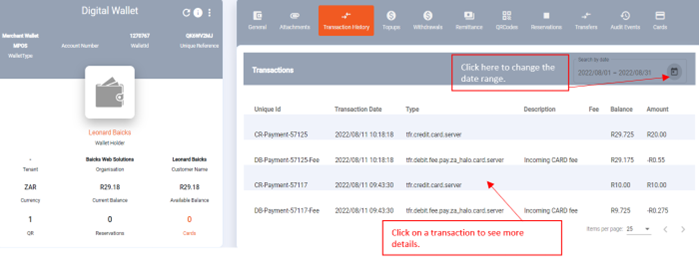
This is where all transactions linked to the associated wallet can be viewed. Transactions can be date filtered (maximum – 30 day range); Click on a transaction to see more details.
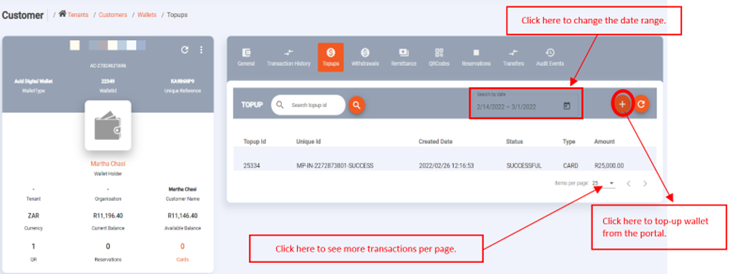
3. Top-Ups
This is where you can view all successful top-ups done on a wallet; Authorized users can also do top-ups to the associated wallet from a Tenant wallet or Third party.
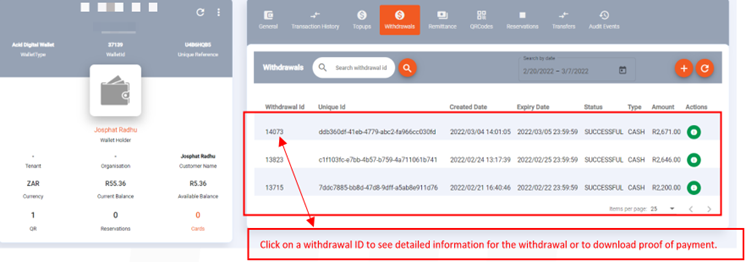
4. Withdrawals
This is where you will see the withdrawal history for a wallet including the withdrawal status. Paycorp withdrawals can be deleted under reservations if the status is pending.
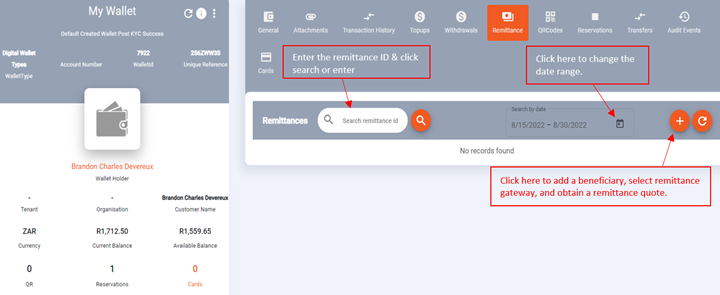
5. Remittance
This function is available under the selected wallet on the portal. A remittance transaction can be searched using the remittance ID, an admin user can also filter remittance transactions by date range see below:
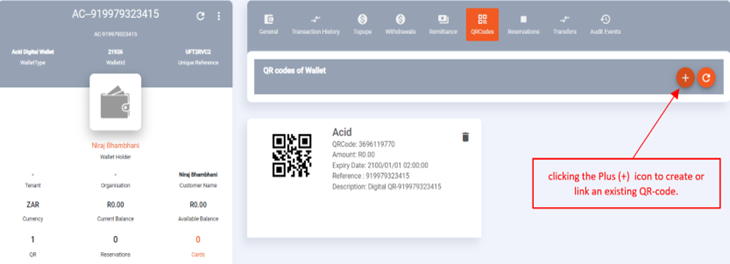
6. QR Codes
This shows the QR-code and image linked to the associated wallet. Clicking the plus (+) icon allows a user to create or link an existing QR-code (some wallets does not have a QR linked to it):
7. Reservations
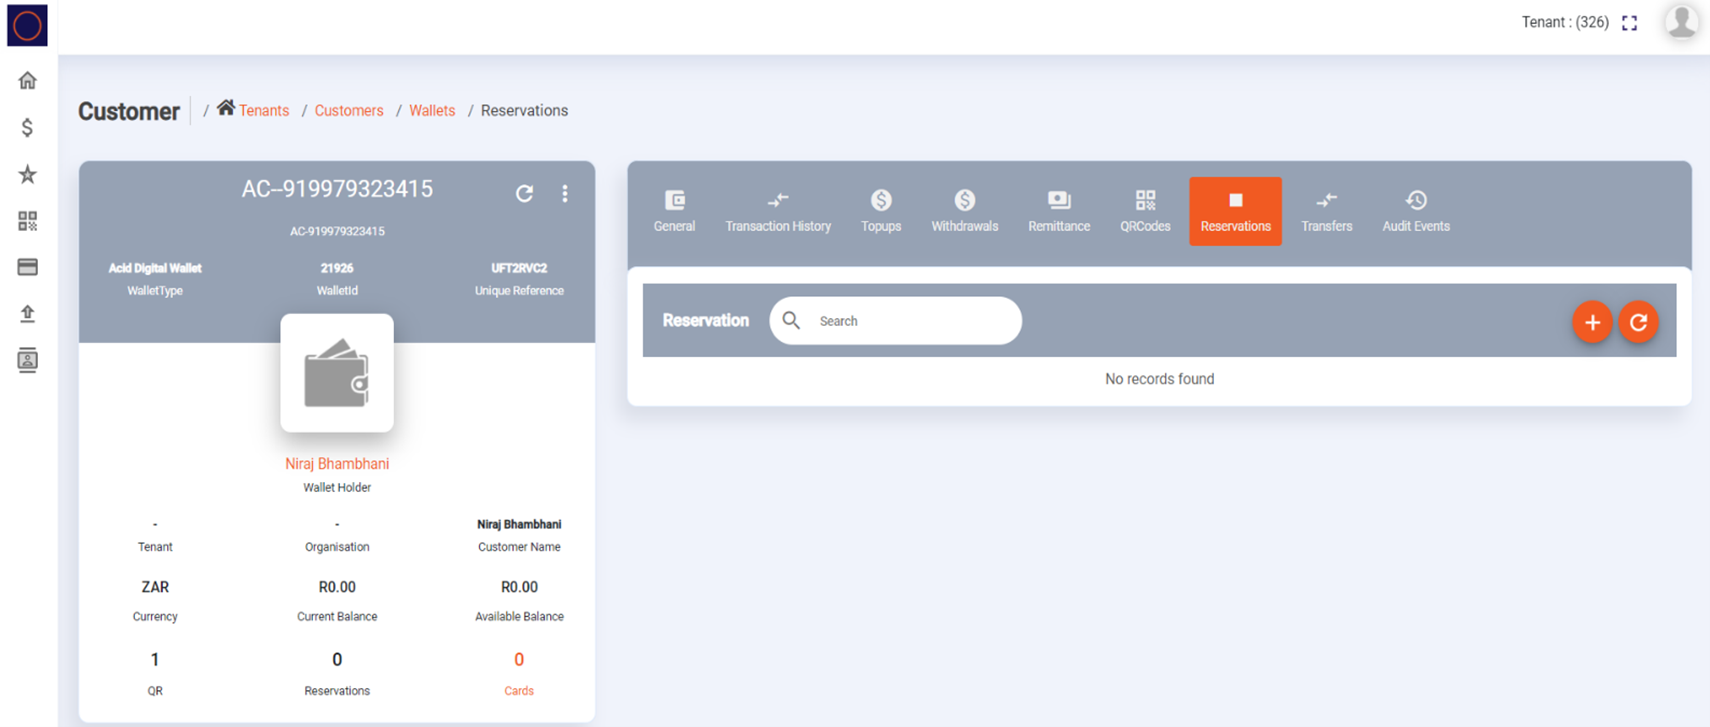
The user will be able to view all reservations of the associated wallet on the page;
If the current balance and available balance do not correspond check under
Reservations and any unsettled amounts will reflect on this page (if a client wants to cancel a Paycorp withdrawal, the reservation can be deleted if the transaction is pending):
8. Transfers
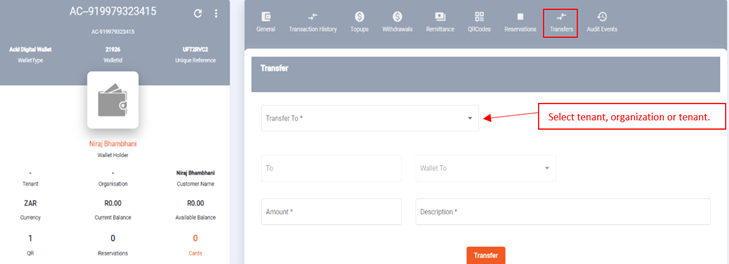
Specific admin users can transfer funds from a tenant wallet to another tenant wallet, customer or organization wallet:
9. Audit Events
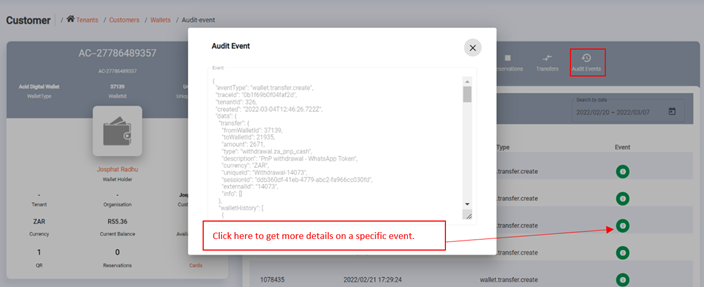
This provides a user with a list of audit events, giving all the details of a transaction/event on the associated wallet and wallet history:
10. Cards
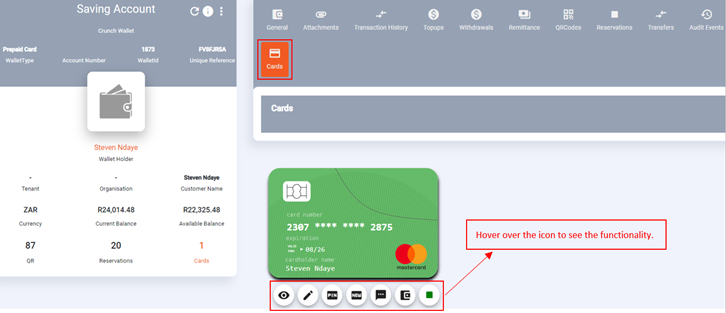
An admin user will be able to see any card linked to the associated wallet ID under this tab, you can view the card details (pack ID, date created, expiry date, etc), edit properties (change card status), reset pin, send pin to customer and view card status:
Updated 3 months ago
