
Authentication and Authorisation
All calls to the Eclipse ReST API must pass an HTTP header “Authorization” where the value consists of “Bearer <JWT>” where <JWT> is a JSON Web Token.
Example
authorization: Bearer eyJhbGciOiJIUzI1NiJ9.eyJzdWIiOiJiY2x1YXBAZ21haWwuYr9tIiwidWlkIjoyMDMsImNoIjoiRUt6Y0YwQnBzSyIsInJvbGVzIjoiY3VzdG9tZXIiLCJpc3MiOiJodHRwOlwvXC9qaW5pLmd1cnUiLCJleHAiOjE1NDc3Njg2MjF9.KCx9TY-yLOPkbCVrFz_sfNAGC0FVAcTksaIFs2TToaM
The Token allows the Ukheshe servers to identify and authorize the API caller on each request without needing to pass the password on each API call. It tells the server who the caller is and the permissions they have. To obtain a token, there are 2 options - one with a simple identity/password and one more secure which in addition, uses PKI to allow the client and server to guarantee the authenticity of each other. Eclipse does not enforce the use of PKI as simple tenants may choose not to use this, but the risk sits entirely with the tenant as without PKI, a compromised tenant password could allow anyone to impersonate the tenant, and unlike private keys, passwords are transmitted over the wire on auth requests making them more susceptible to exposure.
Note
Eclipse identities must be globally unique as an authentication request is not tenant-aware. I.e. if tenant A has an identity of [email protected], then that identity cannot also be used by tenant B. We thus recommend that if tenants create identities for customers using something like a phone number, then they should be prefixed or suffixed with something so that clashes cannot happen. E.g. phone number 27841122334 could have an identity like XX-27841122334 where XX is some abbreviation for the tenant's name or something like [email protected]
Simple Identity/Password
HTTP Method
POST URL: {baseURL}/rest/v1/authentication/login

Content-Type: application/json
Body:
{
  "identity": "0800000000",
  "password": "sandbox"
}
The identity is the customers/admin users username and the password is their password.
Assuming the identity and password are valid, the API will return a body such as:
{
   "expires" : "2020-07-24T09:49:58Z",
   "expiresEpochSecs" : 1595584198,
   "headerName" : "Authorization",
   "headerValue" : "Bearer eyJhbGciOiJIUzI1NiJ9.eyJzdWIiOiIwODAwMDAwMDAwIiwidWlkIjo1NjQsImNoIjoiNWlQeFo2N1Y3NiIsInJvbGVzIjoiY3VzdG9tZXIiLCJzZXNzIjoiOWRhMzNiYzktYzhiZS00NGNlLTk3M2MtZGZjNDVkZTBjZDc3IiwiaXNzIjoiaHR0cDpcL1wvamluaS5ndXJ1IiwiZXhwIjoxNTk1NTg0MTk4fQ.kAGOMTQFZ8v215zHJ9syrNrE7SOdoS39iGwA_WkN-fU",
   "roles" : [
      "customer"
   ],
   "sessionId" : "9da33bc9-c8be-44ce-973c-dfc45de0cd77"
}
The expires value indicates when the token expires and a new one should be requested as the current one will no longer work. This is also provided in a code-friendly expiresEpochSecs value which is the number of seconds after 1970/01/01 UTC. The headerName tells the caller what to name the header (it's not case sensitive) and headerValue is what the header's value should be.
Tokens expire after 15min but this may change and hence the expiry should be checked and adhered to. Expired tokens can be renewed within 30 days of expiry by posting the JWT to the /renew endpoint. A new fresh JWT will be returned unless if the old one was logged out.
JWT’s should be created with a login and reused by the caller until it expires. Tokens should not be created unnecessarily - e.g. do not create a new JWT for every API call. To ensure tokens are reused, Eclipse will return an error if an identity is attempted to be logged in more than 40 times in an hour.
Identity/Password + TOTP
Eclipse authentication allows admin users and customers to include multi-factor authentication over and above identity/password This can be set on new or existing identities and adds an additional RFC 6238 compliant one-time password requirement when authenticating. By simply creating or updating an identity and setting totpEnabled=true, Eclipse will respond with text which can be encoded as a QRCode and loaded into any RFC6238 compliant authentication app (E.g. Google Authenticator, Microsoft Authenticator etc.).
This then forces subsequent authentication requests to provide the 6-digit one-time password for the user. This password changes every minute and can only be accessed by someone who has the App and enrolled the QRCode in the App at the time of creating the identity. This is the identical principle to MFA authentication on platforms such as AWS.
Identity/Password + PKI (Potentially TOTP)
This authentication mechanism should be used for tenant system level access and for customers with large balances or wallets which will only be accessed with system API’s.
The PKI authentication uses pairs of public/private keys held by the tenant and Eclipse. The tenant has a keypair for each identity they wish to secure with PKI, while Eclipse has a single keypair used to prove to clients that they are communicating with the true Eclipse API (and not an impersonator).
In order to authenticate with PKI, the flow is as follows:
Prerequisites
- Client generates a 4096bit RSA public/private keypair as follows and stores the private key in a secure location and never exposes it to anyone (not even Eclipse):
openssl req -nodes -x509 -sha256 -newkey rsa:4096 -keyout "PrivateKey.key" -out "PublicKey.crt" -days 99999
- Client extracts the public key and sets it on the identity they wish to use PKI with the below example
POST on /eclipse-conductor/rest/v1/tenants/{tenantId}/admin-users or /eclipse-conductor/rest/v1/tenants/{tenantId}/customers/{customerId}/identities
The base64 encoded public key can be extracted from PublicKey.crt as follows:
openssl x509 -in PublicKey.crt -pubkey -noout | grep -v "\-\-\-" | base64 -d| base64 -w0
- Client has requested and received Eclipses’s public key out of band (e.g. sent by email by Eclipse support)
MIICIjANBgkqhkiG9w0BAQEFAAOCAg8AMIICCgKCAgEA2cJSqdgRyq2mvH0I0pg+pEBTKvuiQc/Bz2jIv8gvqXEx7l8AnBgaqFi53WnaCpumYF0+xjEqvfjlSWQGv6pkI/ZFCRJtZsehEvJ0DUo4qqByBgRCf28yGCSNxq3Nr/EFEqR+rmwSeegFo1x/QgtHzdOT/32EI0i19vY1eVARM1f2YWfHxZR+zP6g+pm2RKI8cQ01udez4MMB/rhyy3id0/BAk/x/kx3+Y2qyKqqfhTSqjhs/gqnXg9VTvizMzyJoxQZs+jgJJmbw+7WssstdvbqLe7+lJVgpDUdBs3768UPlaoYPDBkWtnS7U7W6zFHSsYu/wk3aYQIMKZqq/vZmBqzV65oajK9Bt2viCRj5RvNClshQW+OLSeIkUrna5Xq1YkhYJTHDHd5qfaOdBDxFXFscfKkn9CM1LZT/siLeNkuBPTpaoRR+Wtp1SheUIc+IC0f3CSYZrwRnuOn2tnGPbkLkEnDPxyx6sU97MEqjtQwgNPZTRI6YD4D4o/NRcmJ76OOtIJuoaMNoWv8p4FIFJ2AxVwQVxRav9LEcByIEZukrMU1wTRnRvhfQgjG3idbg3XiUeTYdgGg1XjYB39JJ16w7cv4QW+J1kpl3BGL+ZgzlIiBZ8vd9Ou/4Ft12PT5TqVd0z4yciiZRL5eDHxn+KiM5GbRzapczI/jEA+vDutcCAwEAAQ==
Or GET https://eclipse-java-sandbox.ukheshe.rocks/eclipse-conductor/rest/v1/global/config/pkiAuthPublicKey
MIICIjANBgkqhkiG9w0BAQEFAAOCAg8AMIICCgKCAgEAt20dRiY7sKgm/dLyjM6o1/Mm+vLlvx2yX1W5hRtQwIZ8bHZUrMitaM5tQJ9uuZ3wpqYSvz7CJ8FxAtevSSGYj345uk/rrHCT0xW64IzZbNeIcI19QowLKItx1PkmOb8MR/SfMoc/JUg8WuM/AaaBmwOLGFk14+KI5v5+nCgLFoyZdUSuBVCvww1tJV694JblXbAhZLwJqeEXabnrIox/P956Au/rK3LqTpiwISg930lck8q6hjRIu76QQjU2U0UYTxcm+eRDZ0eiqRLF7ZNrzIBfYCOf5X2okzW95Du0yqLK/WqVWOvj5kYcSdc0IXBg7Gvojz/wNZbM6GPD5x5RL86uOe5IqwnYogTc4UpoCnwtMF9MlpIPyu0ykD4kfspwWZQnSe5LrlkstlW22ZpoZFmqin4lNBwHfNQeGLb9HabiGCJ0XTTgswh0lOXnu6sB9I1mH7h0RBVAqas84rRNVRZwQFYLqQFyRphPt9rGUT+RgG9NMnBVkEUAis+p2dM8q1MrQfuzmZnS1EhnSLevfJxDFQI+tK4d2Bo4P2wbWhPF7YfhOJq3MmuKyvsAS2hDtix0w6mUrSqHKsGA+1YAE4+NILpriMeAR8aICRabxcBl8bJywuNuHYcfZ4IBZoUWG4ZUcLWudTEQOrKGSypoPcIU6WrFAswPpXHJJ1N/gPMCAwEAAQ==
Or GET https://ukheshe.live/eclipse-conductor/rest/v1/global/config/pkiAuthPublicKey
Authentication Flow
-
Client calls GET /eclipse-conductor/rest/v1/authentication/login-challenges passing 2 query parameters: the identity they want to authenticate with and base64 encoded data called clientChallenge. clientChallenge is generated by the client by generating 64 bytes of random data and encrypting it with the Eclipse public key using RSA/ECB/OAEPWithSHA-1AndMGF1Padding and then base64 encoding the result. The client should store a SHA256 hash of the pre-encrypted 64 bytes so that it can verify the response sent by the server.
-
Eclipse receives the request and decodes and decrypts clientChallenge using Eclipses’ private key and does a SHA256 of the result and base64 encodes that and puts it in response field base64EncodedClientChallengeResponse. Next Eclipse generates its own random challenge and encrypts it with the public key stored against the identity passed by the client and puts the base64 encoded result in field base64EncodedChallenge. Eclipse stores a SHA256 hash of its pre-encrypted challenge in order to verify the client's response to the challenge coming in the next step.
-
The client checks that the server's base64EncodedClientChallengeResponse is correct and if so knows the server must be in possession of the Eclipse private key. Assuming its correct (if not stop immediately), the client decrypts base64EncodedChallenge and gets a SHA256 hash of the decrypted data and puts this as base64 in a field called base64EncodedChallengeResponse in a body soon to be posted to the /eclipse-conductor/rest/v1/authentication/login endpoint. It also does a SHA256 hash of the challenge it was asked to decrypt so that the server knows what challenge this is in response to. This is put as base64 in field base64EncodedChallengeHash. The identity and password fields are populated as per the simple identity/password authentication detailed earlier. This is posted to /eclipse-conductor/rest/v1/authentication/login (This must be done within 600s of step 2 on sandbox and 60s on live)
-
The server receives the login request and verifies that the client's response to the challenge is correct as well as the identity/password being correct. The server thus knows that the client must be in possession of the private key for the public key it has on record for the identity being authenticated. The server responds with a JWT as before.
package com.mycompany.crypt;

import java.security.KeyFactory;
import java.security.MessageDigest;
import java.security.SecureRandom;
import java.security.spec.PKCS8EncodedKeySpec;
import java.security.spec.X509EncodedKeySpec;
import java.util.Base64;
import javax.crypto.Cipher;

public class Main {

    public static void main(String[] args) {
        try {
            if ("generate-challenge".equals(args[0])) {
                generateChallengeAndExpectedResponse();
            } else if ("generate-response".equals(args[0])) {
                decryptServerChallenge(args[1]);
            } else {
                System.out.println("Mode can be generate-challenge or generate-response");
            }
        } catch (Exception e) {
            e.printStackTrace();
        }
    }

    public static void generateChallengeAndExpectedResponse() throws Exception {
        // Get from your own configuration somewhere. This will have been sent to you out of band as per prerequisite 3
        // E.g. This is the Eclipse sandbox public key hardcoded as an example
        byte[] x509PublicKey = Base64.getDecoder().decode("MIICIjANBgkqhkiG9w0BAQEFAAOCAg8AMIICCgKCAgEA2cJSqdgRyq2mvH0I0pg+pEBTKvuiQc/Bz2jIv8gvqXEx7l8AnBgaqFi53WnaCpumYF0+xjEqvfjlSWQGv6pkI/ZFCRJtZsehEvJ0DUo4qqByBgRCf28yGCSNxq3Nr/EFEqR+rmwSeegFo1x/QgtHzdOT/32EI0i19vY1eVARM1f2YWfHxZR+zP6g+pm2RKI8cQ01udez4MMB/rhyy3id0/BAk/x/kx3+Y2qyKqqfhTSqjhs/gqnXg9VTvizMzyJoxQZs+jgJJmbw+7WssstdvbqLe7+lJVgpDUdBs3768UPlaoYPDBkWtnS7U7W6zFHSsYu/wk3aYQIMKZqq/vZmBqzV65oajK9Bt2viCRj5RvNClshQW+OLSeIkUrna5Xq1YkhYJTHDHd5qfaOdBDxFXFscfKkn9CM1LZT/siLeNkuBPTpaoRR+Wtp1SheUIc+IC0f3CSYZrwRnuOn2tnGPbkLkEnDPxyx6sU97MEqjtQwgNPZTRI6YD4D4o/NRcmJ76OOtIJuoaMNoWv8p4FIFJ2AxVwQVxRav9LEcByIEZukrMU1wTRnRvhfQgjG3idbg3XiUeTYdgGg1XjYB39JJ16w7cv4QW+J1kpl3BGL+ZgzlIiBZ8vd9Ou/4Ft12PT5TqVd0z4yciiZRL5eDHxn+KiM5GbRzapczI/jEA+vDutcCAwEAAQ==");
        byte[] randomData = new byte[64];
        SecureRandom.getInstanceStrong().nextBytes(randomData);
        String expectedResponseFromEclipse = Base64.getEncoder().encodeToString(MessageDigest.getInstance("SHA-256").digest(randomData));
        Cipher oaepFromAlgo = Cipher.getInstance("RSA/ECB/OAEPWithSHA-1AndMGF1Padding");
        X509EncodedKeySpec publicSpec = new X509EncodedKeySpec(x509PublicKey);
        KeyFactory keyFactory = KeyFactory.getInstance("RSA");
        oaepFromAlgo.init(Cipher.ENCRYPT_MODE, keyFactory.generatePublic(publicSpec));
        String challengeToEclipse = Base64.getEncoder().encodeToString(oaepFromAlgo.doFinal(randomData));
        System.out.println("challengeToEclipse (What Eclipse should be able to decrypt): " + challengeToEclipse);
        System.out.println("expectedResponseFromEclipse (What Eclipse should return to the login-challenge call): " + expectedResponseFromEclipse);
    }

    public static void decryptServerChallenge(String serverChallengeBase64) throws Exception {
        // Your private key created with:
        // openssl req -nodes -x509 -sha256 -newkey rsa:4096 -keyout "PrivateKey.key" -out "PublicKey.crt" -days 99999
        // Then for the public key to set on Eclipse identity: openssl x509 -in PublicKey.crt -pubkey -noout |grep -v "\-\-\-\-\-"| base64 -d| base64 -w0
        // Then for the private key to encrypt with: cat PrivateKey.key |grep -v "\-\-\-\-\-"| base64 -d| base64 -w0
        // This is just an example private key. DO NOT USE THIS IN PROD. The corresponding public key is:
        // MIICIjANBgkqhkiG9w0BAQEFAAOCAg8AMIICCgKCAgEAwTWV08TJLo/y+N67DjlFh0RFO4oyULlF5oWBain5xWzycFvbDTdiPJvyfdACNsnEBcssjz5zD5ZOOQrJrYRgI2MzkhxmiXUWJAndZOixk6dhQObKru46xSRyOnI97UxFE4oBG+BLlC/jQucc7SF3yGUCzdbugd4poLpn0CcVPGMfcPoVKNgK2XmyZAmZO13vgZctyS9VHHWwB1sOEtIUr4zkcon1lBZRqBv49y0d/QMkQ6Aeqi/C3T4VPqhCDJNvG7h8RUTbroQav5YSnNwf4j+2rE4U1QO2Sc/noMWK1Xd8V792Nx61itfITNGhZEenPPyzVb9n8G6AlXsx+Kk8WpJB9zbBvn8yqcXAZR5cHUz5fpmGnCIs4t1LclOxoqsXyrEtwT1dGGi22QD9zAEhw97NjXqhAH3rR4Z75qp51zFWnLgm4IrC+Blu6mA7cG8pbER7CU6y7+tEVGtYgRiGT16Wmi4JKrjOlxcup+uQ+N+rBA8nfN3WP28Va6W0aXoWMnEao2PtHv3UYj7+TWZ/xDXb88D6fh+DngBHeI5axuh++Z74akXYzD9frsDKk9y/wWQv2a20HftQIlVMLYu84ZBUnyQj7VxqYQ2yuNu9jJKY38SlAlgWKgAQF6owtG8YUFdGgBGig/Odd9bU94SGwwi24LnT2mSsN6O+OyUo+lcCAwEAAQ==
        byte[] pkcs8EncodedPrivateKey = Base64.getDecoder().decode("MIIJQgIBADANBgkqhkiG9w0BAQEFAASCCSwwggkoAgEAAoICAQDBNZXTxMkuj/L43rsOOUWHREU7ijJQuUXmhYFqKfnFbPJwW9sNN2I8m/J90AI2ycQFyyyPPnMPlk45CsmthGAjYzOSHGaJdRYkCd1k6LGTp2FA5squ7jrFJHI6cj3tTEUTigEb4EuUL+NC5xztIXfIZQLN1u6B3imgumfQJxU8Yx9w+hUo2ArZebJkCZk7Xe+Bly3JL1UcdbAHWw4S0hSvjORyifWUFlGoG/j3LR39AyRDoB6qL8LdPhU+qEIMk28buHxFRNuuhBq/lhKc3B/iP7asThTVA7ZJz+egxYrVd3xXv3Y3HrWK18hM0aFkR6c8/LNVv2fwboCVezH4qTxakkH3NsG+fzKpxcBlHlwdTPl+mYacIizi3UtyU7GiqxfKsS3BPV0YaLbZAP3MASHD3s2NeqEAfetHhnvmqnnXMVacuCbgisL4GW7qYDtwbylsRHsJTrLv60RUa1iBGIZPXpaaLgkquM6XFy6n65D436sEDyd83dY/bxVrpbRpehYycRqjY+0e/dRiPv5NZn/ENdvzwPp+H4OeAEd4jlrG6H75nvhqRdjMP1+uwMqT3L/BZC/ZrbQd+1AiVUwti7zhkFSfJCPtXGphDbK4272MkpjfxKUCWBYqABAXqjC0bxhQV0aAEaKD85131tT3hIbDCLbgudPaZKw3o747JSj6VwIDAQABAoICAALTA7Oqxr4VgJm+t8FHeQq3JsPuCzo+2xS5kuC4aFxIcWrPDO6uhpMYPH02UzH11RW4mJgnc4sgyVfwHm6Y5sbdpl1WaPFNcttoAYJ+HEpqQfOu6/uOo/FJzRmpndogKUpV1BpSNwidgpbxxex5dsTJJTdZEvd3BejBkM7sI1VUpZsDLNgCAHaZXtAzi7fgcaXVTegI9xeJaN9Sp2wDAiZmytgZyCs4AE2Syxrh3/RY3WjXqFsYg6K0S5802nJQnWksUzS4AvYUHEf8q5z7YsPt5n+yTH+opDuD/IDPIm5oZrrpo5K+siyrZtQopFFQ8tLjZsO0HpLXKq4EtQBLiQRLWzKQu7Y0z1KTx4jss8XCay18QSryBZOsAgiC1Vd0tG5BdG/QxNw0wA59N4TtaScvSGklh99bwHwYkoX2EFrpqQeXa4G4BT1b9grVMddAKCdY76biOSqLarpSX1363vEfAj6FqkaKUPIfYU7HcWrpicdSNlmD5pP+cAeKCshyBsu7V83AqJIMixVRVw+BE/TEXMSdaRsf5FWy6sil85dw/+8ztbKJ1AfC/gcpVYia/OVkKnNvKP5L7YHJM4YH1TZ0Z6WmVsX+oKoJv06ysmVH24zlItVf4ZiIj+x/4bbgaGztclpT3QYHfAnALU1XJajU7gANxGX9puOHGe0bJ/thAoIBAQD+ralLGA24igFNPeoTDekeisZWoyxFWi+9/LutZGgkA56n+lD7xl5+EC7AXAtnBm6fUDsw+nBPxhLDq/C40Et2m8596U1j5bhDIuXNhK42QUYeE0vsjjoGrPjaEBIhlClLbK3BJNBSV8u8zOCfyisZdY4AdDPG1gFvtkQSEBqqMJATAKuPuEZHdLbn116xANEPzLqBAOZ1qPBzEdysN+3rivdeGdEtp7MdxKa7xJWdCRIlYopZdMLDqU3n35kc3D6NnNHjSqulntICcZ3J8rXRSzUlnTLRNiLE90b56VlI6esN/B2ZeIzqgwkF7PTnMRIzTmIWWUi3lOvy3UpFzh8ZAoIBAQDCNkNACAla05PeBk0EtLG5rDTwaLpeBQUA7DyQbcCpUE7OOgv+EWNwuhu/0/OpDL5q40k3vddcryJOrAKdIpqwlzKVVmO2X9H0Ysl0EgezdE56C9zy9xPMvE3pjL+aPYIDTMm15ebNNxPzYs4LDlMhaiRKHKTyojUsyx541VjAEP0vuos2dVNWZ7kfd/FYHKcsEAgId5QwreTMrfm/3hDyblfcJzdq4QptjaEKt3IVoCLvvvyYAgpFELoM37DuRyx3Mz6PTJupQgcvPLYO0+4z/MOOiQKki3mPatYVxDbGKtUFEtzMx6fNOitrFH+OGl9wtboGOwjYJWkWkcmRkcLvAoIBAQDTO4yf2TqAJg7AVysPVMlW6Llq4Hn2p7/Tb4zmWtI5lLsCDg8fVL/JBXkRWQaoE+CqyKvfisiekeW8X58QWstMfBw/uMLUqZM0M/ywgmzQWUFj7pNZh/m+0baxfwTazv2VLnXLLdKPiXxVgwSH4/HtcuAtpjPPpm6Yjm9VIABNymulJzgkwy2fVMHj93D1lHzSAvdpyipbypxshJMoUFdItwFHDli96ksY1KOKN5n0HrLrSRkA62QjTwhr2rwvAMntQPWg9Kz7eIgtOLkr5+A/0IYrRYABoEokXgiDfbTtUf8AoWyXfzI5zCcuwAO8wamb3lZivPkgMyekT0CsNzL5AoIBAHaTxu+7eGq6L9gppLCw2qpw2EnIx7FMA0gS9M+CE1XNMLB9hID1gO980iCHeofGviRo7XVZNbrjO2EpaNckH6qeRkYj3vGlA33hKvrxXz5UTu35fEfkT3R7rF5ij0HPOChno+ipnAfEDyxVMVRSxLLsKYgOgS+bljfpNIu2R1/Nf6i6jvELJXzmC4OJKhQQOomOqDjzOcmXAtFtj8V0AojikkZas11QVZuaE6+FXeSSR4J166er5zVQByiBE3gIgL+uzA2WSpxHMjfHK6lWAGRBeez2/mQUvH2yT1Au4vqPgEx+vc1SQcPuNkBE3bSXqZoZeqD/PmEqRkV/ccCtbIUCggEAcrAQWZNzlGrpDHYUYZilHpUtGzU7/utQomhoBw29Di4FbJHD2gHEGd2flCLdXwe9HRj/cVCOagNcH7jjhfRt3lup8ogZaG6n+8NvQUJxtbP7JGfdmMNT06Y0mQk6kIp1+gMeMJ/ECCHgxdlgYwcJbDxQ/eCFuQUpM0vElkiqBr4ioBZgPEuIWjLNuKJ314W8BiGXQTH5vDnhPcGhOWSPaNHVGHKbZC2EpBRq5tXK2BylkFJxT6AUfD51N8MbBsS1fl95AUijKtaPjEJ7WFzvnXmncrKLC+HY7wb9qAc3X3BlViVMffmn6nDK6AtEc8PnUtLqqjsdj/OCy4jiCezL2A==");
        PKCS8EncodedKeySpec privateSpec = new PKCS8EncodedKeySpec(pkcs8EncodedPrivateKey);
        KeyFactory keyFactory = KeyFactory.getInstance("RSA");
        byte[] serverChallenge = Base64.getDecoder().decode(serverChallengeBase64);
        Cipher oaepFromAlgo = Cipher.getInstance("RSA/ECB/OAEPWithSHA-1AndMGF1Padding");
        oaepFromAlgo.init(Cipher.DECRYPT_MODE, keyFactory.generatePrivate(privateSpec));
        byte[] decryptedChallenge = oaepFromAlgo.doFinal(serverChallenge);
        String base64EncodedChallengeResponse = Base64.getEncoder().encodeToString(MessageDigest.getInstance("SHA-256").digest(decryptedChallenge));
        String base64EncodedChallengeHash = Base64.getEncoder().encodeToString(MessageDigest.getInstance("SHA-256").digest(serverChallenge));
        System.out.println("base64EncodedChallengeResponse: " + base64EncodedChallengeResponse);
        System.out.println("base64EncodedChallengeHash: " + base64EncodedChallengeHash);

    }

}
Here is an end to end example done with the above code on sandbox:
- Create admin user. Here we use the same public/private key as per the previous example:

Create Admin User
- Run java program to generate login challenge request:
challengeToEclipse (What Eclipse should be able to decrypt): 1TGcy5l3ZnmndwWPGk1s++IqVMOpOx46AH+8MgTIX07byn485agyYIdLsNaHyph4K/gDfjeXdbc+fyOCkqAaQYsMhhE5ttcAmBEuX0NueEXDccCoJ9A3IwGEzOzqHZjp3egiYrsU5Jn23nDT1XHMSrRY21p1DdilwnoYlnOXO+uRf8xRSrZLKUekPx43O6Rpy/AShRl2gwQug9zgAap40blT6aSEIL27bq0zzk9VJoeiQfncL7P3OM/kI3eP146enUuML8pmyqnUf0NX9lkkXLO4rz9ZCdw/UZHMicuvc2Jcwt4AEDnxZlbQLT6eYptMqzg6XcbgOfZvC2fKOGhN0rfgZVw81/e6UjC6ZipBkco2jqpwSgh6qeqy2MnGvg/VTtD7RNUT9VigqLiIDTDraD2y5sdXtP8SewcfDFX4eUUAzq2dG9yb6//5w9TmkdefSwFUKqJsqQldpOF0iHI9cvzaTgidsJwrZzgGtXYewm18cRRGvtzdYkl7+YQje9AtnwRmSKse6Z068YALqxDvxBbK0TLa8pS+O0j0GfJI3hLS9DAGA5NS/8UIp9/Yq3S8HxJUnP0k5SZd8K4pY9xb9TzQOoyGNy/g1qjzC2tAe0+aw0eMxFAlwtyzIw5A2PYkfW5NdSXTaz5cEDpelBrRfGNdJ+KGwl0fLM5CIbY+MbQ=S
expectedResponseFromEclipse (What Eclipse should return to the login-challenge call): DeAObN6HXiBfXPNEczTpEmAJxTwakG/RSGOe0w8+e8U=
- Send request to get login challenge:
curl -X GET "https://eclipse-java-sandbox.ukheshe.rocks/eclipse-conductor/rest/v1/authentication/login-challenges?clientChallenge=1TGcy5l3ZnmndwWPGk1s%2B%2BIqVMOpOx46AH%2B8MgTIX07byn485agyYIdLsNaHyph4K%2FgDfjeXdbc%2BfyOCkqAaQYsMhhE5ttcAmBEuX0NueEXDccCoJ9A3IwGEzOzqHZjp3egiYrsU5Jn23nDT1XHMSrRY21p1DdilwnoYlnOXO%2BuRf8xRSrZLKUekPx43O6Rpy%2FAShRl2gwQug9zgAap40blT6aSEIL27bq0zzk9VJoeiQfncL7P3OM%2FkI3eP146enUuML8pmyqnUf0NX9lkkXLO4rz9ZCdw%2FUZHMicuvc2Jcwt4AEDnxZlbQLT6eYptMqzg6XcbgOfZvC2fKOGhN0rfgZVw81%2Fe6UjC6ZipBkco2jqpwSgh6qeqy2MnGvg%2FVTtD7RNUT9VigqLiIDTDraD2y5sdXtP8SewcfDFX4eUUAzq2dG9yb6%2F%2F5w9TmkdefSwFUKqJsqQldpOF0iHI9cvzaTgidsJwrZzgGtXYewm18cRRGvtzdYkl7%2BYQje9AtnwRmSKse6Z068YALqxDvxBbK0TLa8pS%2BO0j0GfJI3hLS9DAGA5NS%2F8UIp9%2FYq3S8HxJUnP0k5SZd8K4pY9xb9TzQOoyGNy%2Fg1qjzC2tAe0%2Baw0eMxFAlwtyzIw5A2PYkfW5NdSXTaz5cEDpelBrRfGNdJ%2BKGwl0fLM5CIbY%2BMbQ%3D&identity=testidentity" -H  "accept: application/json"
{"expires":"2021-01-28T16:07:13.020278683Z","base64EncodedChallenge":"dL2TobNg1K6ISkw2L80zH8c6E7K7yQNndHDA/ntKuw/K6k0IsIbEUfkwQf5vUwNQSjApSne5QORXx3ZCFe4BroP3HRLxR7v3dPhYiSBbZGPP3XMdfq3Zm4eztSVcNtv+JZOiAJvghbO4hvqHy8rjvEFBTAhqlcMB6wejpvZBxdd3cqQCwrCACrgQ2GzRvo1nA505qVyB/2v7IpX/AXyjHxiqX9PZxJz9gLdRSHNllL6mrjWL9B8ldvCjBwdk0nYc1zfX46Lw1/2kdsdZYMkOsiFwy5E9lYSBssdYAXzRmuwkko16vSiw4BPEb3VZl4WpGkjtvgnEpnqAGlTq+fuVXwl4fDEG53OxkNOn0uLGV3s6hlgtkYdpqOzmy10g1wIHuzEZo3q7SXpBL+mQC+NWS2uFOE9RFDolI+JGwk6ZVknNGeCalv7wwF+d6eQD5Ip8VRKD72d1Ce8g6JJYp3viUWDMEPbz0HNkos4NQlLG3uxLovXn/Jq/b+9Aygw3jIMHXDin6ETkkymqfNdmqjoC0jpl07kxVK+Ny3NLE7jYoKFmAT6UNodGOwC4TSdWu6ebL/4SNAVThC4ZzaLtnTypSRSRhDWEbUj63478RgSE+z3Iy+paChwhSr8q3VnyPMrFzsrsvjxUL4uXVqWAF44oP7PO+bW0AkwUcsGgZVS+LeE=","base64EncodedClientChallengeResponse":"DeAObN6HXiBfXPNEczTpEmAJxTwakG/RSGOe0w8+e8U="}
-
Verify DeAObN6HXiBfXPNEczTpEmAJxTwakG/RSGOe0w8+e8U= is correct
-
Pass base64EncodedChallenge to the java program:
base64EncodedChallengeResponse: wadU7UwGsjY2Zs10mbqZxLNvy/EjPSLdb7WmwdpAnwc=
base64EncodedChallengeHash: jNyQxcZIXgvuzDOfEOQQ1ACisGQ2uKa8RqG4/JWPUCM=
- Login using the challenge response and hash and identity and password:
curl -X POST "https://eclipse-java-sandbox.ukheshe.rocks/eclipse-conductor/rest/v1/authentication/login" -H  "accept: application/json" -H  "Content-Type: application/json" -d "{\"base64EncodedChallengeHash\":\"jNyQxcZIXgvuzDOfEOQQ1ACisGQ2uKa8RqG4/JWPUCM=\",\"base64EncodedChallengeResponse\":\"wadU7UwGsjY2Zs10mbqZxLNvy/EjPSLdb7WmwdpAnwc=\",\"identity\":\"testidentity\",\"password\":\"testpassword\"}"

{
  "headerName": "Authorization",
  "headerValue": "Bearer eyJhbGciOiJIUzI1NiJ9.eyJzdWIiOiJ0ZXN0aWRlbnRpdHkiLCJ1aWQiOjMxLCJwb3MiOlt7Im8iOjE1LCJkIjowLCJwIjoiVEVOQU5UX1NZU1RFTSJ9XSwiY2giOiJHUzB5Q2RCd25NIiwicm9sZXMiOiIiLCJzZXNzIjoiYzA1NmIyZDgtZDZkMS00ZWE2LTg3NTItZTg3ZjY4NGIyOTAzIiwiaXNzIjoiaHR0cDpcL1wvamluaS5ndXJ1IiwiZXhwIjoxNjExODUxNDEzLCJ0ZW5hbnQiOjE1fQ.j1QDr6G2TdraAAJFum6IVenFzeUfJteoaiD-bq134mY",
  "sessionId": "c056b2d8-d6d1-4ea6-8752-e87f684b2903",
  "expires": "2021-01-28T16:30:13.341Z",
  "expiresEpochSecs": 1611851413
Security Questions
Security questions are a common authentication mechanism used by to help verify the identity of their users. When setting up an account or resetting a password, users are typically required to answer a series of questions that only they should know the answer to. In general, security questions can be a useful tool in a larger security strategy, but they should not be relied upon as the sole means of authentication.
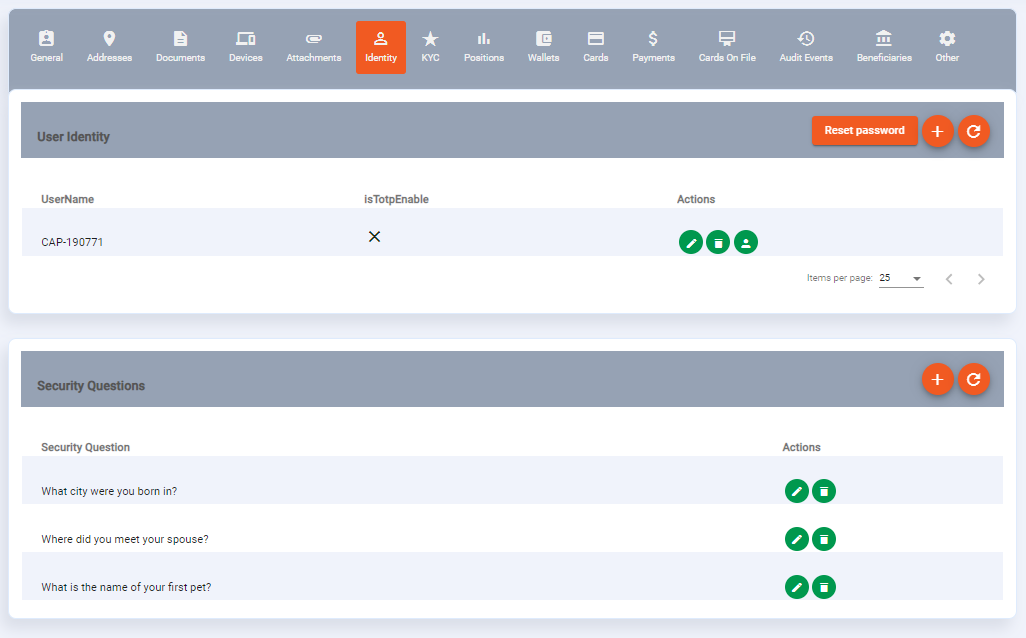
Security questions and answers can be stored against a customer profile using the create security questions endpoint and deleted using the delete security questions endpoint. Questions can be retrieved using the get security questions endpoint. In addition this can be managed through the Admin Portal under the Identities tab:
If security questions are present on a customer profile they will form part of authentication step when changing device fingerprint (see Device Fingerprint for more detail) and when resetting a password (see Reset Password for more detail).
You can enforce the number of security questions that must be answered for authentication and password reset by setting tenant config require.number.security.questions. This allows tenants to ensure that authentication step up mandates security questions even if they have not been added to the profile and allows tenants to set the number of questions that must be answered to allow authentication step e.g. there are 5 questions but only 3 need to be answered correctly.
Device Fingerprint
To turn on device fingerprint authentication (recommended), set tenant property auth.device.fingerprint.enabled to true. This will require that all password based authentication logins must also include the deviceFingerprint string. How this string is generated is implementation specific but could for example be a unique device id, hash of a user agent or similar. The goal is that the device fingerprint is another "what the customer has" factor of authentication and helps prevent a bad actor with the customers username/password from logging in.
At first, a customer will not have a device fingerprint stored against it. When the first successful authentication is done, the passed fingerprint will be stored and any subsequent logins must have that same fingerprint passed. If the fingerprint changes then the login will fail with code USR015 (HTTP 401). To change the fingerprint on record, do a login with correct identity and password as well as the otp string populated and new fingerprint. The OTP can be sent to the identities phone on record via a call to send a verification code (POST /eclipse-conductor/rest/v1/global/verifications). Subsequent logins will then succeed with the new fingerprint and with the old fingerprint.
Note that if auth.device.fingerprint.enabled=true, deviceFingerprint must be passed on all password-based login calls unless if the identity or users position matches the regular expression set in tenant config parameter "auth.device.fingerprint.skip.if.matches". E.g. if auth.device.fingerprint.skip.if.matches=^onboarding$ then the user with identity "onboarding" will not need a fingerprint. E.g. if auth.device.fingerprint.skip.if.matches=^onboarding$|TENANT_SYSTEM then the user with identity "onboarding" will not need a fingerprint and nor will any user who is TENANT_SYSTEM. This is useful for identities used in Apps for onboarding and other scenarios where an OTP cannot be provided.
By default, the 5 most recent fingerprints are stored and can be used - this can be configured by setting tenant config auth.device.fingerprints.max. The fingerprints can be viewed on the customer and can be DELETED if necessary. To make fingerprints distinguishable, the fingerprint can be passed in the format :. This allows one to identify the fingerprints with something other than just its unique hash. E.g. pass a deviceFingerprint as "Android 10 Samsung S20:dheuiwd321gi213eijiowh". The part before the ":" will be used as the name of the fingerprint and the part after the ":" will be the actual fingerprint.
Note that if a customer has security questions, then when the login is done with an OTP to add a device fingerprint, the answers to the security questions should also be provided or else the login will fail. The security questions can be retrieved by calling GET /eclipse-conductor/rest/v1/global/verifications/{identity}?code={otp} . They will only be returned if the OTP is correct.
Below is an example flow for adding a new device fingerpint when security questions are present on a customer profile:
-
POST eclipse-conductor/rest/v1/authentication/login
{
"identity": "richard",
"password": "rpass",
"deviceFingerprint": "newdevice:98765"
}
Example response body:
{
    "type": "BUSINESS",
    "severity": "LOW",
    "description": "Device fingerprint is not enrolled",
    "code": "USR015",
    "traceId": "21d93eae0f90074c"
}
- Trigger Eclipse to send an OTP:
POST /eclipse-conductor/rest/v1/global/verifications
{
"identity":"richard"
}
- Verify that the OTP is correct and retrieve security questions (note in sandbox as no OTP is sent you can use 911911 as an override):
GET /eclipse-conductor/rest/v1/global/verifications/richard?code=911911
Example response body:
{"securityQuestions":
	[
		{"securityQuestionId":5,"customerId":29520,"question":"Q1","created":"2023-05-04T10:49:41.000Z","lastModified":"2023-05-04T10:49:41.000Z"},
		{"securityQuestionId":6,"customerId":29520,"question":"Q2","created":"2023-05-04T19:01:42.000Z","lastModified":"2023-05-04T19:01:42.000Z"}
	]
}
- Login with credentials, OTP, security answers and new device fingerprint and new fingerprint will be added:
POST /eclipse-conductor/rest/v1/authentication/login
{
  "securityQuestionAnswers": [
    {
      "securityQuestionId": 5,
      "answer": "A1"
    },
    {
      "securityQuestionId": 6,
      "answer": "A2"
    }
  ],
  "identity": "richard",
  "otp": "911911",
  "password": "rpass",
  "deviceFingerprint": "newdevice:98765"
}
POST /eclipse-conductor/rest/v1/authentication/login
{
"identity": "locked_identity",
"password": "test123"
}
[
  {
    "type": "BUSINESS",
    "severity": "LOW",
    "description": "Identity has expired and cannot be used",
    "code": "USR020",
    "traceId": "43b86cc1f08e1s3e"
  }
]
Reset Password
Two APIs play a key role in the password reset process, one for initiating the password reset and one for actually changing the password. These APIs are typically part of a larger authentication and authorization system and are responsible for handling the specific actions involved in resetting a password.
The passord-change-init API is responsible for generating and sending the OTP via SMS OR a link via Email. When a user requests a password reset and specifies the type as OTP, the system will generate a unique one-time code that is valid for 300 seconds (this value can be overridden by setting tenant property user.service.otp.validity.seconds) that is sent to the user's registered mobile phone number. This API typically interfaces with a third-party SMS gateway to handle the actual delivery of the message. Once the user receives the OTP, they can use it to verify their identity and reset their password.
When a user requests a password reset and specifies the type as LINK, the system will generate a unique URL that the user can click on to reset their password. This URL typically expires after a set amount of time (the default is 1 day but this can be overridden by setting tenant property user.service.link.validity.seconds) to prevent it from being used maliciously. This API may also be responsible for handling the sending of the email itself, either through a built-in email delivery system or by interfacing with a third-party email gateway.
The first API, which initiates the password reset, might look something like this:
POST eclipse-conductor/rest/v1/global/identities/{identity}/password-change-init
{
  "type": "LINK"
}
This API allows a user to request a password reset and specifies the type of reset to be used (in this case, LINK). The {identity} parameter in the URL would be replaced with the user's unique identity. If the request is successful, the API will typically return a 200 response code and an email will be sent to the user's registered email address.
The second API, which actually changes the password, might look something like this:
POST eclipse-conductor/rest/v1/global/identities/{identity}/password-change
{
  "hash": "string",
  "password": "string"
}
This API allows a user to change their password by providing a hash and a new password. The hash is the system generated code that is returned as an OTP if the type of reset is OTP, or the code embedded in the returned link if the type of reset is LINK. The {identity} parameter in the URL would again be replaced with the user's unique identity. If the request is successful, the API will typically return a 200 response code.
Both of these APIs are critical to the password reset process and are often used in conjunction with the OTP and link delivery mechanisms described earlier. By providing a secure and reliable way for users to reset their passwords, these APIs help to ensure that sensitive information is protected and that user accounts remain secure.
Configuration
| Property | value | comments |
|---|---|---|
| mustache.email.customer.password.reset | # From: [email protected]# To: {{data.email}}# Subject: Reset Password to the Astra Sandbox Hi {{data.identity}} A request has been received to reset your password. Please click <a href=https://eclipse-portal-admin-sandbox.ukheshe.rocks/admin-portal/authentication/reset-password?resetPasswordLink={{data.resetPasswordLink}}>here to reset your password. Regards, Eclipse team. | Tenants can configure the template accordingly but the link must always specify a valid Eclipse Admin Portal URL. i.e. for sandbox the sandbox Admin Portal URL should be specified, for production the production Admin Portal URL should be specified. |
| mustache.sms.init.password.change | # To: {{data.user.phone1}}Your lost password OTP is {{data.verificationCode}} |
Security Questions for password reset
If a customer has security questions, then when the password change endpoint is called, the answers to the security questions must be supplied as well. The security questions can be retrieved by calling GET /eclipse-conductor/rest/v1/global/verifications/{identity}?code={otp} . They will only be returned if the OTP is correct.
Comparison documents for password reset
To further protect the password change capability a tenant can be configured to require that comparison documents be provided for a password change to be allowed.
The following documents can be used as supported documents for password reset:
- FACIAL_PHOTO - This will compare the facial image to the existing FACIAL_PHOTO on file and ensure that the liveness test is passed before allowing password change. Optionally, we can use aws liveness as well as described below.
- NATIONAL_IDENTITY - this will compare the facial image in the national identity document to the existing document on file and ensure that the document is legitimate before allowing password change.
- PASSPORT - this will compare the facial image in the passport document to the existing document on file and ensure that the document is legitimate before allowing password change.
- ASYLUM_PAPERS - this will compare the facial image in the asylum papers document to the existing document on file and ensure that the document is legitimate before allowing password change.
Configuration
To enable comparison documents for password reset tenant config comparisonDocumentRequiredForPasswordChange must be set to true.
A tenant can specify which documents they would like to accept (e.g. a tenant may only want to allow password reset if a FACIAL_PHOTO is provided that pass a liveness check) by setting tenant config supportedComparisonDocuments. This is a comma separate list of the supported documents and defaults to FACIAL_PHOTO.
Using liveness to reset password
A common use case is to perform a liveness check and confirm through facial matching that the person in the liveness check has a facial match with existing images stored on file before allowing a password to be changed.
Eclipse supports static liveness test by providing a selfie image as well as AWS liveness detection that uses video streaming - for more details please refer here.
Tenants can be configured to use AWS liveness detection or the simpler static liveness detection when specifying FACIAL_PHOTO as a comparison document for password change. When using the static liveness detection users must provide a selfie with thumbs up included as base64EncodedComparisonDocument when changing the password.
When using AWS liveness detection the following is required:
Prequisites:
- The following tenant configs are required:
- comparisonDocumentRequiredForPasswordChange must be set to true
- supportedComparisonDocuments must include FACIAL_PHOTO
- ratifyUserProcessors must include selfieIsLegitimate=AWSLivenessRatifyProcessor
- password.change.otp.required.with.aws.liveness - if set to true this enforces that an OTP be provided as well as completing the liveness check. Defaults to false.
- enforce.liveness.for.facial.photo.based.password.change - if set to true this will enforce that only AWS liveness can be used to change a password and not static liveness detection, i.e. users will not be able to change password by providing a selfie as a base64EncodedComparisonDocument, they will have to perform AWS liveness detection. Default to false.
- Initiate AWS liveness by passing "AWS_LIVENESS" as type. This will return "awsLivenessSessionId" in response.
POST eclipse-conductor/rest/v1/global/identities/{identity}/password-change-init
{
  "type": "AWS_LIVENESS"
}
Response:
{
  "info":  "{\"awsLivenessSessionId\":\"b08a719b-2d4a-4adf-93f7-1c079848436f\"}"
}
To use "Eclipse hosted aws liveness" , optionally, can pass "landingUrl" in "info" request field. In this case, it will return "completionUrl" as well in response "info" field.
- Perform AWS liveness detection - for implementation details please refer to AWS Liveness
- Call password-change with "awsLivenessSessionId" to change your password.
POST eclipse-conductor/rest/v1/global/identities/{identity}/password-change
{
  "comparisonDocumentType": "FACIAL_PHOTO",
  "password": "1234567",
  "extraInfo": "{\"awsLivenessSessionId\":\"b08a719b-2d4a-4adf-93f7-1c079848436f\"}"
}
Managing Identities
An identity is stored on a customer - Eclipse supports locking an identity and enforcing a password change on an identity.
Creating an identity
To create an identity on a customer the customer identities endpoint should be used. Identities can be created as simple identity and password, TOTP or PKI.
Here is an example request to create an identity on a customer with simple identity and password:
POST /eclipse-conductor/rest/v1/tenants/{tenantId}/customers/{customerId}/identities
{
	"identity": "bob.smith",
	"password": "UotfTV)D4MTCY",
}
Example response:
{
	"identity": "bob.smith",
	"totpEnabled": false
}
Note
Eclipse can be configured to send out an email to the user when an identity is created, to set their password for the first time. To enable this an email needs to be specified on the customer profile and tenant config mustache.email.onboarding.user needs to be set to a valid mustache template that will be used to send an email to the customer.
Locking an identity
An identity has a field authLockedAfter that defines the datetime after which an identity can no longer be used. This can be set to any date in the past to essentially lock a identity from logging in.
Example where a user attempts to login with an identity that has authLockedAfter set to a datetime in the past:
POST /eclipse-conductor/rest/v1/authentication/login
{
"identity": "locked_identity",
"password": "test123"
}
[
  {
    "type": "BUSINESS",
    "severity": "LOW",
    "description": "Identity has expired and cannot be used",
    "code": "USR020",
    "traceId": "43b86cc1f08e1s3e"
  }
]
Temporarily locking an identity
Eclipse has built in brute force detection and rate limiting capabilities (see Rate Limiting) - there are a number of conditions under which an identity can be temporarily locked.
1. Incorrect login attempts
By default an identity is locked after 10 failed login attempts for 5 minutes. This is globally configured through the following sub-properties of global property user.auth.config
- lock.at.failed.attempt.no - the number of failed login attempts after which the identity is locked. Default value 10.
- lock.minutes - the number of minutes the identity will be locked for. Default value is 5.
2. Incorrect password change attempts
When changing a password there are a number of events that will trigger a failed attempt including:
- Invalid OTP provided
- Invalid password provided
- Invalid security answers provided
- Selfie does not match on password change
These events can trigger that the identity be locked. This is controlled by the following tenant configurations:
- enable.lock.at.failed.password.change - this enables the identity lock feature. Default value is false.
- lock.at.failed.password.change.attempt.no - If identity lock is enabled this is the number of identity change events that will trigger that the identity be locked.
- lock.at.failed.password.change.minutes - if identity lock is enabled this is the number of minutes the identity will be locked for.
3. Incorrect OTP verification
When verifying an OTP, if the OTP is entered incorrectly 3 times in 10 minutes that OTP is invalidated and a new one needs to be requested.
Example response when identity is locked:
{
	"type" : "BUSINESS",
	"severity" : "LOW",
	"description" : "Identity is locked due to muliple authentication failures. Try again later",
	"code" : "USR001",
	"traceId" : "173def7a20a684eea4127bf920050822",
	"spanId" : "173def0fdhfghn4127bf920050822"
}
Enforcing password change
An identity has a field changeAfter that can be used to enforce a password change on an identity. When this date is in the past a user logging in with this identity will be prompted to change their password before being able to login.
This allows tenants to manage password rotation - on identity creation the changeAfter field can be set to a time in the future and when that time is reached, and the password is changed the changeAfter field can be updated to a another time in the future.
It also allows tenants to support "single use passwords" - where a single use password can be sent to a customer that forces them to immediately set a new password before logging in. This is a common onboarding pattern.
Example where a user attempts to login with an identity that has changeAfter set to a datetime in the past:
POST /eclipse-conductor/rest/v1/authentication/login
{
"identity": "password_change_identity",
"password": "test123"
}
[
  {
    "type": "BUSINESS",
    "severity": "LOW",
    "description": "Identity requires a password change in order to be used",
    "code": "USR021",
    "traceId": "b81904a145614a4b9"
  }
]
The user can now use the password-change endpoint with their current password to set a new password and then they will be able to successfully login:
POST /eclipse-conductor/rest/v1/global/identities/password_change_identity/password-change
{
"currentPassword": "test123"
}
Bulk identity reset
To reset all a customers identities, one can do a bulk reset identities as follows:
PUT /eclipse-conductor/rest/v1/tenants/{tenantId}/customers/{customerId}/identities
{
	"status":"RESET"
}
This will do the following:
- Remove TOTP and public keys off the identity
- Set a random password on each identity
- SMS the password to the customer using template mustache.sms.identities.reset
- Delete all security questions
- Set changeAfter on each identity to the current date/time
Enforcing password complexity
Tenants can specify the required password complexity when setting passwords for admin users (users with a tenant position) or end users (users that only have the CUSTOMER position). This is managed by these tenant configurations:
- admin.user.password.complexity.regex - this defines a regular expression to which a password must confirm when being set on admin users. If it does not conform then an error is returned: "Password is too weak"
- user.identity.password.complexity.regex - this defines a regular expression to which a password must confirm when being set on CUSTOMER users. If it does not conform then an error is returned: "Password is too weak"
Note
The above configurations will enforce password complexity when calling Eclipse APIs to set a password. These rules would also need to be enforced in any front end channel and prompts given to the end customer on the complexity requirement.
Post Authentication Logic
As well as authentication and authorisation on login, Eclipse allows tenants to define custom logic to to prevent or allow a customer to login. This caters for scenarios where a tenant wants to ensure certain prerequisites have been met before a customer can login, for example Terms and Conditions must be accepted.
Post authentication logic is specified as Javassist in a property that starts with post.authentication.logic. The following entities are available for use in this logic: customerId, role, identity and position. Here is an example property, post.authentication.logic.termsandconditions, that will ensure that an attachment exists on the customer profile titled registrationTerms before a customer role can login.
public static com.ukheshe.eclipse.conductor.model.EclipsePostAuthenticationLogicResult executePostLogic(
            com.ukheshe.arch.aaa.UserData userData,
            com.ukheshe.eclipse.conductor.helper.EclipsePostAuthenticationLogicHelper eclipsePostLogicHelper) {
        com.ukheshe.eclipse.conductor.model.EclipsePostAuthenticationLogicResult eclipsePostLogicResult = new com.ukheshe.eclipse.conductor.model.EclipsePostAuthenticationLogicResult();
        if (userData.getRoles().isEmpty() && userData.getPositions().isEmpty()) {
            boolean found = false;
            for (int i = 0; i < eclipsePostLogicHelper.getUserAttachments(userData.getUserId()).size(); i++) {
                com.ukheshe.eclipse.conductor.model.EclipseAttachment attchment = (com.ukheshe.eclipse.conductor.model.EclipseAttachment) eclipsePostLogicHelper.getUserAttachments(userData.getUserId()).get(i);
                if (attchment.getFileName().equals("registrationTerms")) {
                    found = true;
                    break;
                }
            }
            if (found) {
                eclipsePostLogicResult.setSuccess(true);
                return eclipsePostLogicResult;
            } else {
                throw new IllegalStateException();
            }
        }
        eclipsePostLogicResult.setSuccess(true);
        return eclipsePostLogicResult;
    }
This can be enabled on a tenant by setting tenant config postAuthenticationLogic. For example to enforce the above terms and conditions logic on a tenant, postAuthenticationLogic should be set to termsandconditions.
SAML 2 Single Sign On
Tenants can use their own IDP for admin user access. Eclipse can delegate authentication to the IDP and map the IDP’s identity to an identity in Eclipse. Eclipse still manages the users rights/permissions but does not store the authentication credentials. To sign up a user to use SSO, no password needs to be set and the SSO option must be selected:

Admin User
In order for the tenant to be configured for SAML SSO, Eclipse needs the following information from the IDP:
- URL Target of the IdP where Eclipse will send the Authentication Request Message. Commonly known as “SSO URL”
- Identifier of the IdP entity (must be a URI). Commonly known as Entity ID
- Public x509 certificate of the IdP
On the IDP, the following configuration should be used. {tenant short name to be agreed}:
- ACS URL: https://ukheshe.live/eclipse-conductor/saml-acs/{tenant short name}
- Entity ID: https://ukheshe.live/admin-portal
- Start URL (signed response enabled): https://ukheshe.live/eclipse-conductor/saml-login/{tenant short name}
- Name ID format: UNSPECIFIED
- Name ID: Primary email address
As an example, here is the configuration on Google Apps IDP:

Google Apps IDP
WebAuthN
Eclipse supports passwordless WebAuthN (FIDO2 compliant) authentication. 2 tenant level configuration parameters are required to enable this:
webAuthN.parentDomain : The domain name that the WebAuthN credentials should be valid for. E.g. myfintech.com
webAuthN.friendlyName : The friendly name for this Authentication service. E.g. My Fintech
Registration
To create a WebAuth identity for a customer, start by POSTing a simple empty identity on the {customerId}/identities endpoint:
POST eclipse-conductor/rest/v1/tenants/{tenantId}/customers/{customerId}/identities
{
  "identity": "MyWebAuthNUserName"
}
At this point the identity is unusable as there is no password, but is ready to be augmented to be used for WebAuthN. To augment it, Eclipse needs to be given a public key from the customers Authenticator device (laptop, mobile phone etc) as per the standard WebAuthN flow. To initialise this, get a WebAuthN challenge from Eclipse for this identity:
GET eclipse-conductor/rest/v1/authentication/login-challenges/?identity=MyWebAuthNUserName
The result looks something like this:
{
  "expires": "2022-11-29T19:58:36.306Z",
  "base64EncodedChallenge": "eyJycCI6eyJuYW1lIjoiTXkgRmludGVjaCIsImlkIjoibXlmaW50ZWNoLmNvbSJ9LCJ1c2VyIjp7Im5hbWUiOiJNeVdlYkF1dGhOVXNlck5hbWUiLCJkaXNwbGF5TmFtZSI6Ik15V2ViQXV0aE5Vc2VyTmFtZSIsImlkIjoiQUFBQUFBQUFBQTgifSwiY2hhbGxlbmdlIjoiNEQ4RW42QVFieTVEVHdmeGE0OWRQMGx0TEowZGoxLWpIcDR2X21OVFdFdyIsInB1YktleUNyZWRQYXJhbXMiOlt7ImFsZyI6LTcsInR5cGUiOiJwdWJsaWMta2V5In0seyJhbGciOi04LCJ0eXBlIjoicHVibGljLWtleSJ9LHsiYWxnIjotMzUsInR5cGUiOiJwdWJsaWMta2V5In0seyJhbGciOi0zNiwidHlwZSI6InB1YmxpYy1rZXkifSx7ImFsZyI6LTI1NywidHlwZSI6InB1YmxpYy1rZXkifV0sImV4Y2x1ZGVDcmVkZW50aWFscyI6W10sImF0dGVzdGF0aW9uIjoibm9uZSIsImV4dGVuc2lvbnMiOnsiY3JlZFByb3BzIjp0cnVlfX0="
}
The field base64EncodedChallenge should be base64 decoded and the result is a string of JSON that contains the WebAuthN challenge information (publicKeyCredentialCreationOptions) required by WebAuthN client libraries. E.g.:
Base64 Decode :
eyJycCI6eyJuYW1lIjoiTXkgRmludGVjaCIsImlkIjoibXlmaW50ZWNoLmNvbSJ9LCJ1c2VyIjp7Im5hbWUiOiJNeVdlYkF1dGhOVXNlck5hbWUiLCJkaXNwbGF5TmFtZSI6Ik15V2ViQXV0aE5Vc2VyTmFtZSIsImlkIjoiQUFBQUFBQUFBQTgifSwiY2hhbGxlbmdlIjoiNEQ4RW42QVFieTVEVHdmeGE0OWRQMGx0TEowZGoxLWpIcDR2X21OVFdFdyIsInB1YktleUNyZWRQYXJhbXMiOlt7ImFsZyI6LTcsInR5cGUiOiJwdWJsaWMta2V5In0seyJhbGciOi04LCJ0eXBlIjoicHVibGljLWtleSJ9LHsiYWxnIjotMzUsInR5cGUiOiJwdWJsaWMta2V5In0seyJhbGciOi0zNiwidHlwZSI6InB1YmxpYy1rZXkifSx7ImFsZyI6LTI1NywidHlwZSI6InB1YmxpYy1rZXkifV0sImV4Y2x1ZGVDcmVkZW50aWFscyI6W10sImF0dGVzdGF0aW9uIjoibm9uZSIsImV4dGVuc2lvbnMiOnsiY3JlZFByb3BzIjp0cnVlfX0=
Is:
{"rp":{"name":"My Fintech","id":"myfintech.com"},"user":{"name":"MyWebAuthNUserName","displayName":"MyWebAuthNUserName","id":"AAAAAAAAAA8"},"challenge":"4D8En6AQby5DTwfxa49dP0ltLJ0dj1-jHp4v_mNTWEw","pubKeyCredParams":[{"alg":-7,"type":"public-key"},{"alg":-8,"type":"public-key"},{"alg":-35,"type":"public-key"},{"alg":-36,"type":"public-key"},{"alg":-257,"type":"public-key"}],"excludeCredentials":[],"attestation":"none","extensions":{"credProps":true}}
This JSON should be given to your chosen WebAuthN client library.
Your WebAuthN client library will then communicate with the underlying hardware Authenticator module of the phone/laptop as well as the customer to approve the registration, and will get a signed response that should be given back to Eclipse via the /login endpoint along with the base64 encoded SHA256 of the challenge JSON itself:
POST /eclipse-conductor/rest/v1/authentication/login
{
  "base64EncodedChallengeHash": "DZ/PuPao3MM8IJk57N3XOiA7X3VXtKYilcH3Mlqx2m8=",
  "base64EncodedChallengeResponse": "Base64 encoded registration result obtained from your WebAuthN client",
  "identity": "MyWebAuthNUserName"
}
If the registration succeeds, you will get a JWT back that can be used to identify that customer. In the meantime, on Eclipse, the identity has been updated to now have enough information (public keys etc) of the customers authenticator to allow for future passwordless authentication.
Authentication
WebAuthN authentication is similar to registration in terms of the pattern of calls. It starts with obtaining a challenge from Eclipse:
GET eclipse-conductor/rest/v1/authentication/login-challenges/?identity=MyWebAuthNUserName
The base64EncodedChallengeResponse field in the response should again be passed to the WebAuthN client, but this time for initiating authentication (not registration like last time). The client will ask the user to authenticate and provide a signed response which can be passed to the /login endpoint along with a Base64 encoded SHA256 of the challenge.
Assuming the response is correct, a JWT will be returned.
Granular Authorization
All JWTs issued on Eclipse contain a list of allowed roles and positions of the authenticated credentials:
Roles
Roles start with “GLOBAL” e.g. GLOBAL_FINANCE_L2. These define access to system functionality across all tenants and are used by Ukheshe Staff or Global integrators who either need to support multiple tenants or call APIs that are not related to a specific tenant.

Global Roles
Positions
Positions are different to roles in that they relate to a specific tenant, or organisation within that tenant. LEVEL_01 to LEVEL_10 and TENANT_SYSTEM are used specifically to note a position within a tenant. These are generally for the staff of a tenant. They are a result of adding an admin user on a tenant. Doing so gives the identity a position in the tenant Id. E.g. TENANT_SYSTEM position in tenant Id 123.
Eclipse uses the names “LEVEL_01” to “LEVEL_10” as placeholders for the roles within the tenants team. For example, the first step in defining the permissions for positions would be to decide on a mapping between the actual roles in the org structure of the tenant (E.g. finance operations, call centre agent, call centre team lead etc.) and the levels 1 to 10. E.g.:
- Call Centre Agent - LEVEL_01
- Call Centre Team Lead - LEVEL_02
- Finance Operations - LEVEL_03
- Finance Manager - LEVEL_04
From then on, when defining the permissions of LEVEL_03 one would know this is for the finance operations team members in the tenant.

Permission Levels
DIRECTOR, EMPLOYEE, HEAD, MANAGER and MEMBER are positions used to denote a position in an organisation within a tenant. This denotes that the custom has a position in one or more organisations and gives them access to the organisation and/or its wallets, addresses, documents etc.

Positions
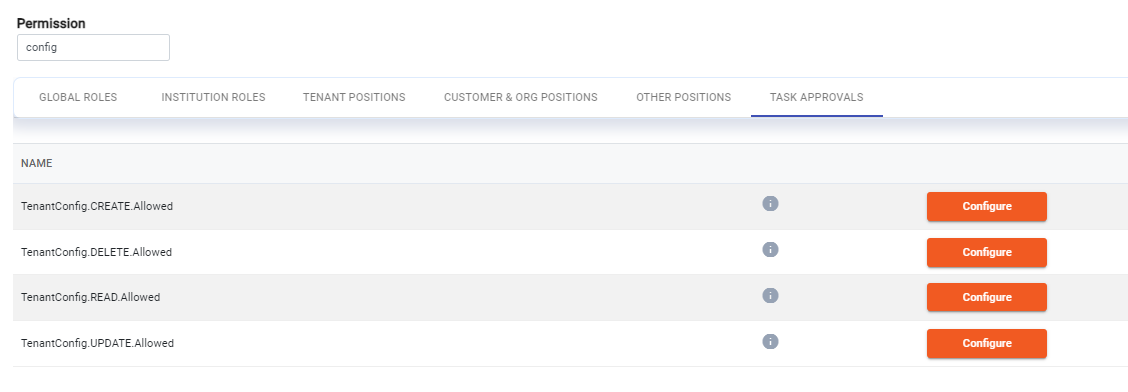
In the Eclipse admin portal, the granular permissions are configured that define what access the various roles and positions have. Along the top are the roles, then admin user positions, then organisation positions and finally two special ones “CUSTOMER” and “ANONYMOUS”.
The rows contain each of the granular permissions and are normally of the format ..Allowed where Item is the thing being accessed, and Action is either READ, UPDATE, CREATE or DELETE.
The resulting matrix defines what the roles and positions can do. There are 3 categories defining what a tick in each box actually means. This is as follows:
-
For roles GLOBAL_ADMIN to GLOBAL_INTEGRATOR and positions LEVEL_01 to TENANT_SYSTEM a tick means the role/position can take the action on the item for any item in that tenant. The relationship between the caller and the item does not matter.
-
For positions HEAD to MEMBER, a tick means that any customer with that position in an organisation can take that action on the organisation or an item that is directly attached to the organisation - i.e. its addresses, wallets, documents etc. As an example, a tick next to Address.UPDATE.Allowed for position HEAD means that anyone who is a head in the organisation can update the organisation's address. This allows permissions to be granted to things based on the customers relationship to it. This is useful for example having shared wallets at an organisation level and allowing access based on the customer's position in the organisation.
-
For CUSTOMER a tick means the customer can take the action on an item that is directly related to that customer. E.g. a tick next to Address.UPDATE.Allowed for CUSTOMER means a customer can update their own address.
-
For ANONYMOUS a tick means someone who did a request with no JWT can take the action on the Item. Typically this is almost never allowed.

Permissions

Permissions
Maker Checker Workflow
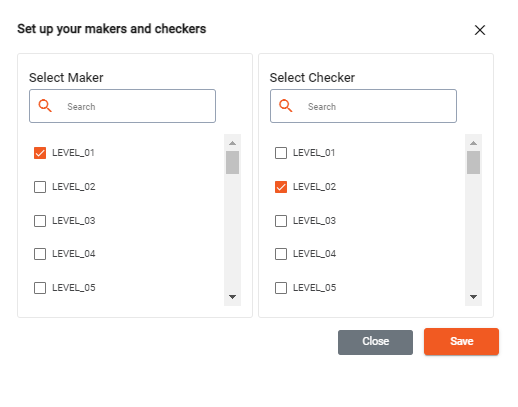
All Eclipse permissions can be configured to allow a user, the maker, to submit changes that must be approved by another user, the checker.
Maker checker permissions
Maker checker permissions are set by adding entries as follows to the tenant.config.{TENANT_ID} property for that tenant:
${PERMISSION}=${MAKER_ROLE}->${CHECKER_ROLE}
e.g.
Address.CREATE.Allowed=LEVEL_01->LEVEL_02
Multiple configurations can be added to a permission as a comma separated list, e.g.
Address.CREATE.Allowed=TENANT_SYSTEM,LEVEL_01->LEVEL_02,LEVEL_01->LEVEL_03
The Permissions Wizard in the Admin Portal can be used to configure maker checker permissions:
Note
The same role or position can be the maker and the checker for a particular permission - if for example you want users with the same role or position to approve each others changes.
Making API calls that need to be approved before execution
Any PUT, POST or DELETE API calls will be submitted as API calls that need approval if the following headers are included in the API calls:
task-executor-roles - this is a comma separated list of the role(s) or position(s) of the user(s) who should approve and execute the call
task-initiator-comment (optional) - this a comment or description that describes the change
task-tag (optional) - this an optional tag to limit the scope of the task and make it easy to search. A typical value might be 'tenantId=X,organisationId=X'
Any API calls submitted with these headers will not be executed - rather they will be stored as internal task objects on Eclipse. Any created task automatically has the state DRAFT.
curl --request POST \
     --url https://${baseurl}/eclipse-conductor/rest/v1/tenants/5990/wallets/transfers \
     --header 'authorization: Bearer ${JWT}' \
     --header 'content-type: application/json' \
     --header 'task-executor-roles: LEVEL_02' \
     --header 'task-initiator-comment: This is a test transfer, submitted for approval' \
     --header 'task-tag: tenantId=5990,organisationId=1234' \
     --data '
{
  "amount": 1054,
  "externalUniqueId": "sfbgdbfg",
  "fromWalletId": 29124,
  "toWalletId": 36543,
  "description": "test"
}'
If the API call is successful and results in a task being created the task ID will be returned in the header of the response:
HTTP/2 200
date: Mon, 27 Mar 2023 18:47:18 GMT
content-length: 0
conductor-host: ip-172-31-33-50.eu-west-1.compute.internal
ratelimit-concurrencyremaining: 10
ratelimit-limit: 1200;window=600;policy="per.tenant";concurrency=10
ratelimit-remaining: 1197
ratelimit-reset: 490
task-id: 16
traceparent: 00-03eb095fa649d2c762ee5fc31b1919c7-5d99383e03a9101a-01
The Admin Portal is a good reference implementation. If a user enters Edit mode all POST and PUT calls are submitted as tasks:

Retrieving tasks
A user can retrieve all tasks for which they have the tag details.
This will also include a friendly description of the change to be done in the description field. Please refer to the API documentation here for more details.
GET eclipse-conductor/rest/v1/global/tasks?tag=tenantId=1234,organisationId=1234
[
  {
    "httpMethod": "POST",
    "path": "/eclipse-conductor/rest/v1/tenants/5990/wallets/transfers",
    "body": "\n{\n  \"amount\": 1054,\n  \"externalUniqueId\": \"sfbgdbfg\",\n  \"fromWalletId\": 29124,\n  \"toWalletId\": 36543,\n  \"description\": \"A transfer\"\n}\n",
    "initiator": 182658,
    "description": "Tenant: Fintech. Transfer of ZAR 1054 from wallet 29124 (Test Digital Wallet:1234) to wallet 36543 (Test bulk:1234) with transfer description: test.",
    "executorRoles": "LEVEL_02",
    "initiatorComment": "This is a test submission for approval",
    "taskId": 1,
    "status": "DRAFT",
    "lastModified": "2023-03-22T19:10:39.000Z",
    "created": "2023-03-22T19:10:39.000Z"
  }
]
Update tasks
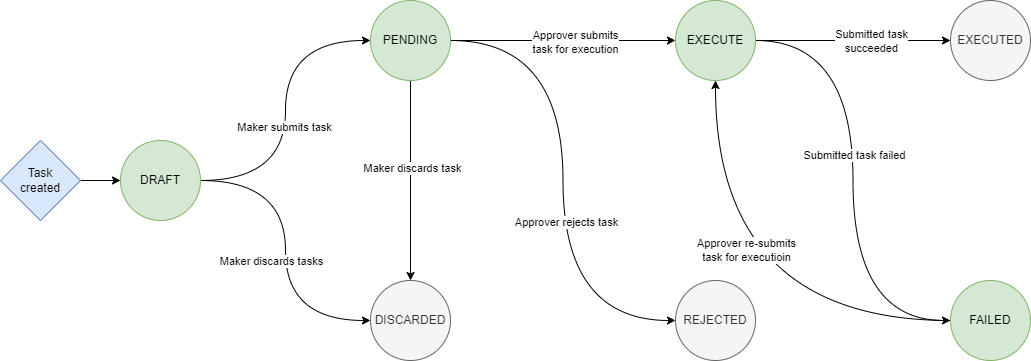
Once a task has been initiated it will be set to DRAFT state. The possible state transitions for a task are shown below:
An initiator or executor can modify a task by updating the status of the task, refer to the API documentation here for more details on updating a task.
- An initiator can submit any tasks in DRAFT state by setting the status to PENDING:
PUT eclipse-conductor/rest/v1/global/tasks/1
{
  "status": "PENDING"
}
- An initiator can discard any tasks in DRAFT state by setting the status to DISCARDED:
PUT eclipse-conductor/rest/v1/global/tasks/1
{
  "status": "DISCARDED"
}
- An executor can reject any tasks in PENDING state by setting the status to REJECTED - note the executor can add an optional comment when updating the task.
PUT eclipse-conductor/rest/v1/global/tasks/1
{
  "status": "REJECTED",
   "executorComment": "Give more detail"
}
- An executor can execute any tasks in PENDING or FAILED state by setting the status to EXECUTE:
PUT eclipse-conductor/rest/v1/global/tasks/1
{
  "status": "EXECUTE"
}
{
  "httpMethod": "POST",
  "path": "/eclipse-conductor/rest/v1/tenants/5990/wallets/transfers",
  "body": "\n{\n  \"amount\": 1054,\n  \"externalUniqueId\": \"sfbgdbfgXXXXX\",\n  \"fromWalletId\": 29124,\n  \"toWalletId\": 36543,\n  \"description\": \"test\"\n}\n",
  "initiator": 182658,
  "executor": 182659,
  "description": "Tenant: Fintech. Transfer of ZAR 1054 from wallet 29124 (Test Digital Wallet) to wallet 36543 (Test bulk) with transfer description: test.",
  "executorRoles": "LEVEL_02",
  "initiatorComment": "This is a test submission for approval",
  "taskId": 2,
  "status": "EXECUTED",
  "lastModified": "2023-03-22T19:37:58.297Z",
  "created": "2023-03-22T19:36:46.000Z",
  "responseBody": "",
  "responseCode": 204
}
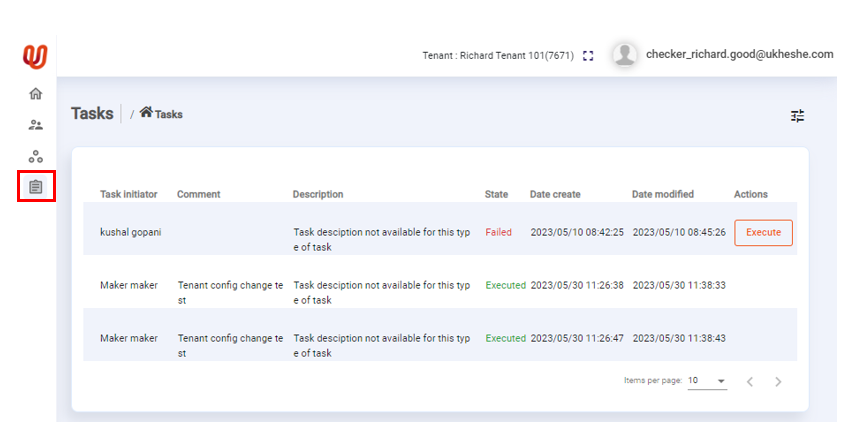
Users in the Admin Portal can view their tasks and depending on the status of the task, to take action:
Note
Whenever an executor updates a task status to EXECUTE, Eclipse will attempt to execute the task as that user. The outcome of that execution is returned in the responseBody and responseCode fields of the task. The task status will be updated to EXECUTED if the responseCode returns a successful HTTP 2xx status code. If the responseCode is not a successful HTTP status code (i.e. not 2xx) the task will be updated to FAILED and the responseBody will indicate the failure reason.
Customer Authentication Patterns
Typically tenants follow one of 2 patterns when their customers are accessing Eclipse:
1. Tenants access Eclipse on behalf of customers
- In this scenario tenants typically use a TENANT_SYSTEM admin user to perform all Eclipse API calls.
- It is mandated that PKI authentication is used for the system user.
- An Eclipse identity of the customer is not required in this scenario.
- If the backend tenant is not PCI compliant then captive portal methods must be used when displaying or editing any PCI scoped data.
- Even though calls are made on behalf of customers there are mechanisms to enforce individual authorisation step-up on a per transaction basis. For more information see Strong Customer Authentication.
2. Customers access Eclipse directly
- In this scenario customer identities are created on Eclipse and customers access Eclipse directly using their own JWT.
- An Eclipse identity on the customer is required in this scenario.
- There are certain advantages to this pattern, one of them being that PCI compliance permits certain card sensitive data to be passed directly to the customer if verified by JWT and IP address. If a non-PCI compliant backend and TENANT_SYSTEM user is being used no card sensitive data can be passed and alternative methods (e.g. captive portals) must be used.
Onboarding
- When customers access Eclipse directly an onboarding user is required to do the first API calls to create the customer and identity before the customer JWT can be requested and used.
- These calls could be supported with an anonymous user but for elevated security we suggest that an onboarding user is created and assigned to the ONBOARDING position.
- This position has a specific set of limited permissions that allows it to CREATE, READ and UPDATE users that have been recently created (how recent is controlled by tenant configuration considerAsNewCustomerMinutes and defaults to 24 hours) and that do not have an identity created.
- This position should only ever be assigned the following permissions:
- ProfileOfNewCustomer.CREATE
- ProfileOfNewCustomer.UPDATE
- ProfileOfNewCustomer.READ
- Attachment.CREATE (this for adding miscellaneous information to a customer on creation.
Note
- An onboarding user adds very limited security through obscurity, any user of the channel can retrieve the credentials. It should be assumed that anyone, anywhere has access to these credentials
- This position should not be used for any other channel capabilities - only onboarding
- As soon as a customer identity is created then the customer JWT should be used for any further access.
In addition there are specifically implemented API calls to aid with onboarding tasks:
- Check if a customer or identity exists
HEAD /eclipse-conductor/rest/v1/tenants/{tenantId}/customers
- This can be used to check if a customer or identity exists without needing explicit read permission on that customer or identity. e.g. before creating a customer or identity use this to check if one exists.
- No specific permission is required for this endpoint, only a JWT.
- Supported query parameters include email, identity (username), nationalIdentityNumber and phone number.
- No customer details are returned, but if the customer exists a 200 response is returned and if the customer does not exist a 404 response is returned.
- Get customerId
GET /eclipse-conductor/rest/v1/tenants/{tenantId}/customers?fields=customerId
- This can be used to check to get a customerId without needing explicit read permission on that customer.
- No specific permission is required for this endpoint, only a JWT.
- No customer details are returned only the customerId.
- Check if a customer has an identity
HEAD /eclipse-conductor/rest/v1/tenants/{tenantId}/customers/{customerId}/identities
- This can be used to check if a customer has an identity without needing explicit read permission on that customer or identity. e.g. if you want to know if a customer can still be onboarded use this to check if an identity exists.
- No specific permission is required for this endpoint, only a JWT.
- No customer details are returned, but if the customer has an identity a 200 response is returned and if the customer does not have an identity a 404 response is returned.
Example onboarding flows
- Typical customer onboarding
This flow depicts the typical customer onboarding and relevant API calls done by the onboarding user.

- Bulk customer onboarding
This flow depicts a less common scenario where tenants bulk create customers and then only already bulk created customers can onboard and have an identity created.

Strong Customer Authentication Step-Up
The granular permissions configuration supports the open banking concept of Strong Customer Authentication (SCA) by requiring individual authorisation step-up on a per-transaction basis. The high-level flow is as follows:

The following SCA methods are supported:
- SCA_OTP - here step authentication is done through an OTP sent to the customer by SMS
- SCA_IDENTITY - here step authentication is done by providing any identity credentials for that customer
- SCA_AWS_LIVENESS - here step authentication is done by performing AWS liveness of the customer
SCA can be enabled through permissions setting using columns "SCA"_OTP" , "SCA"_IDENTITY" or "SCA_AWS_LIVENESS". Eclipse will only enforce SCA if all other permissions are denied - I.e. it is a last resort.

In the example above, permissions have been set so that updating a customer profile requires an OTP. With this enabled, any attempt to update would result in a reply indicating SCA is required, along with a SCA header with the intentId. E.g.:

We can use SCA for multiple operations such as bulk-transfer, transfer, withdrawals, payment, customer profile update and organisation profile update.
In sandbox, an actual SMS is not sent to the customer owning the profile being updated but the override 911911 can be used as the OTP. The SMS sent for SCA OTP uses a default mustache template. This can be overridden by setting tenant config mustache.sms.sca.otp e.g:
#To: {{data.phone}}\r\n{{data.tenantName}}: OTP to approve {{data.operation}}{{data.currency}}{{data.amount}} is {{data.otp}}
The next step would be to do a PUT to upgrade the callers JWT for this specific request, providing the current JWT, OTP and IntentId:

The response contains a new JWT that is specifically bound to the intent and can only be used to resubmit the original request (with IDENTICAL path and body) and it will now succeed.
Note that the upgraded JWT must be requested and used within 3 minutes of the permissions exception being returned to the caller indicating that SCA is required. This is the duration that the intent state is stored in Eclipse waiting for the request to be processed with SCA.
Below is an example flow when performing a withdrawal where the withdrawal permissions has been configured for SCA_IDENTITY: Withdrawal.CREATE.Allowed=SCA_IDENTITY
- Attempt to initiate withdrawal
POST /eclipse-conductor/rest/v1/tenants/{tenantId}/wallets/{walletId}/withdrawals
{
"amount": 50,
"type": "ZA_PAYCORP_ATM",
"externalUniqueId": "123456",
"deliverToPhone": "07212348365"
}
Example response:
Header: sca	id=3e93533bf004409ab647bcc5d11235346454;type=IDENTITY
Body:
{
    "type": "BUSINESS",
    "severity": "LOW",
    "description": "SCA is required to process this request. Auth type required - IDENTITY",
    "code": "SEC004",
    "traceId": "bc7abf117f676632"
}
- Upgrade JWT:
PUT /eclipse-conductor/rest/v1/authentication/jwt
{
  "jwt": "JWT",
  "password": "rpass",
  "identity": "richard",
  "intentId": "3e93533bf004409ab647bcc5d11235346454",
}
- Redo exact original call with upgraded JWT and it will succeed.
- Discard upgraded JWT.
SCA with AWS Liveness
Below is an example flow when performing a withdrawal where the withdrawal permissions has been configured for SCA_AWS_LIVENESS: Withdrawal.CREATE.Allowed=SCA_AWS_LIVENESS
- Attempt to initiate withdrawal
POST /eclipse-conductor/rest/v1/tenants/{tenantId}/wallets/{walletId}/withdrawals
{
"amount": 50,
"type": "ZA_PAYCORP_ATM",
"externalUniqueId": "123456",
"deliverToPhone": "07212348365"
}
Example response:
Header: sca	id=3e93533bf004409ab647bcc5d11235346454;type=AWS_LIVENESS;sessionId=c9f4fee0-d452-40db-8e45-1dd2ea9862dd
Body:
{
    "type": "BUSINESS",
    "severity": "LOW",
    "description": "SCA is required to process this request. Auth type required - AWS_LIVENESS",
    "code": "SEC004",
    "traceId": "bc7abf117f676632"
}
To use "Eclipse hosted aws liveness" in SCA, optionally, can pass "livenessLandingUrl" in request header. In this case, value for "sessionId" will be completionUrl. To construct liveness Completion Url, by default, it will try to identify tenantId and customerId from API path, which can be overriden by request headers "livenessTenantId" and "livenessCustomerId".
- For the given sessionId complete the AWS liveness. Please visit this for more details.
- Upgrade JWT as shown below.
PUT /eclipse-conductor/rest/v1/authentication/jwt
{
  "jwt": "JWT",
  "intentId": "3e93533bf004409ab647bcc5d11235346454",
}
- Redo exact original call with upgraded JWT and it will succeed.
- Discard upgraded JWT.
Updated about 1 month ago