
Admin Users
This section contains an overview of some of the key functions on our Eclipse admin portal
Add new Admin Users
Easily create all your admin users that will be using the Eclipse portal (Admin users can be created by a person who is a tenant system user):

Setup Admin Users
All fields marked with a red cross (x) is mandatory, ensure the correct email is captured
In order for the users to get their sign-in email with the system generated password. Do not create a password for admin users
Kindly note that the email sent to admin users might go to the spam/junk mail folder.
Password must follow tenant specific set password rules, to set such rules please add global property 'config public.tenant.<tenantId>' where it will have below attributes and values
passwordRegEx = This refers to password complexity. i.e. ^[0-9.-/]+$
passwordRegExErrorMsg = This Refers to incorrect password error messages. i.e. Password must have eight characters
Public key authentication for admin users
It is highly recommended that public key authentication is enabled for any TENANT_SYSTEM users:
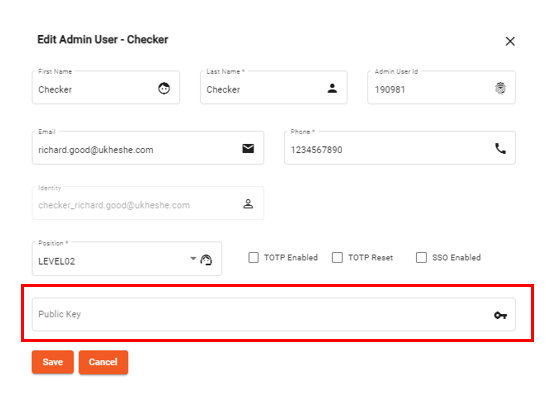
Enable public key authentication on admin users
This is the most secure method, recommended for any backend tenant system account. In this approach, a tenant must load their public key through the Eclipse admin portal. Eclipse will then use this public key to encrypt specific data that can only be decrypted by the holder of the corresponding private key. No credentials are shared in the API calls, ensuring maximum security. For details on enabling this please refer to PKI authentication in the Eclipse Integration Guide.
Note
PKI authentication is in addition to Identity/Password authentication. Therefore when enabling PKI authentication for an admin user please first add the admin user as normal without a public key, to receive a welcome email and set password for the first time. Once this process is complete you can add the public key to the user profile.
Multi-factor authentication (MFA) for admin users
With the increase in cyber security hacks we highly recommend that all admin users enable multi-factor authentication when accessing the admin portal. Eclipse authentication allows admin users and customers to include multi-factor authentication over and above identity/password, based on RFC 6238 Time Based One-Time Passwords. For details on the implementation please refer to Time Based OTP Authentication in the Eclipse Integration Guide.
Once enabled users will need to use any RFC6238 compliant authentication app (for example Google Authenticator, Microsoft Authenticator - both available in all stores) to generate a 6-digit one-time password when logging into the admin portal. This additional authentication means that to compromise an account, hackers would need a user's password as well as access to their device to generate the time-based OTP. These are the steps to enable multi-factor authentication on admin users:
- Add new admin users as described in the Add New Admin Users section above
- For that particular admin user enable TOTP
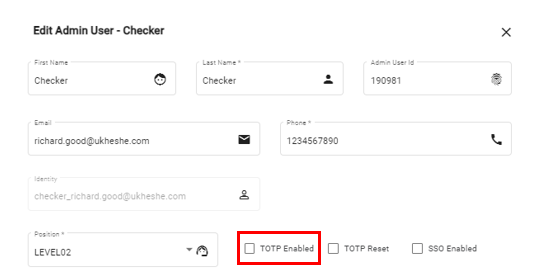
Enable TOTP for admin user
- A QR Code will be displayed that can be scanned and loaded into your favourite RFC6238 compliant authentication app (the most popular are Google Authenticator, Microsoft Authenticator available in all stores)
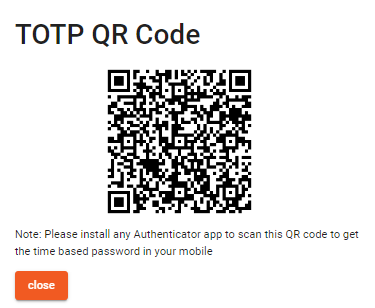
QR to scan with authenticator app
- When logging in, these admin users will now need to provide their password as well the 6 digit OTP
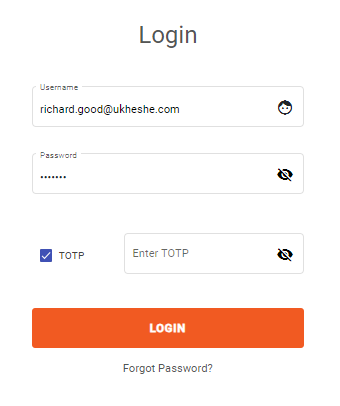
Provide TOTP on login
Configuration & Permissions
Go to configuration and click on the lock pad icon to view the permissions of all user levels, a business/management decision must be taken to decide what permissions each user should have:

Permissions
Go to configuration and click on the permission icon to view the permissions of all user levels, a business/management decision must be taken to decide what permissions each user should have:
Go to configuration and click on the star icon to view all configurations that has been set-up on Eclipse for your business.
Go to configuration and click the menu to view the configuration properties.
Tenant Position Aliases
By setting the tenantPositionAliases property in public property public.tenant.{tenantId} a tenant can set their own tenant position names to be shown in the admin portal.
For example if the tenant support organisation is as follows:
- Call Centre Agent - LEVEL_01
- Call Centre Team Lead - LEVEL_02
- Finance Operations - LEVEL_03
- Finance Manager - LEVEL_04
And public property public.tenant.{tenantId} includes:
tenantPositionAliases=LEVEL_01->Call Centre Agent,LEVEL_02->Call Centre Team Lead,LEVEL_03->Finance Operations,LEVEL_04->Finance Manager
The Admin Portal admin users view and permissions wizard view will be shown with the tenant position aliases:

Admin User View
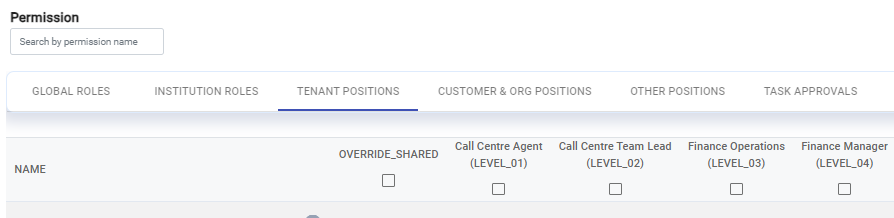
Permissions Wizard View
Updated 2 months ago